Part 2 - Install Software Files
In part1 we did the required pre-installation tasks. This is part2 of Oracle installation, where we will install the software files. We will create a database instance in another step.
Oracle 11.2.0.3 patch is a full installer, so we don't need to install a base version like 11.2.0.1. There are a total of 7 zip files for the patch:
p10404530_112030_Linux-x86-64_1of7.zip
p10404530_112030_Linux-x86-64_2of7.zip
p10404530_112030_Linux-x86-64_3of7.zip
p10404530_112030_Linux-x86-64_4of7.zip
p10404530_112030_Linux-x86-64_5of7.zip
p10404530_112030_Linux-x86-64_6of7.zip
p10404530_112030_Linux-x86-64_7of7.zip
We need to unzip Part 1 and 2 which includes the Oracle Database and Oracle RAC. Part 3 is Oracle Grid Infrastructure, Oracle ASM, Oracle Clusterware, and Oracle Restart. Part 4 is Oracle Database Client. Part 5 is Oracle Gateways. Part 6 is Oracle Examples. Part 7 is Deinstall.
Unzip with the following command:
The contents of the zip's will be extracted to "database" folder in the current directory.
Now connect to the server box with vnc-client as the oracle user, go-to the "database" folder and start the Oracle Universal Installer(OUI) with the following command:
Oracle Universal Installer GUI will start. Below are the screenshots put in order for each step:
1. Configure Security Updates: Uncheck "I wish to receive security updates via My Oracle Support" and click Next. Click Yes to confirm.
2. Download Software Updates: Select "Skip software updates" and click Next.
3. Select Installation Option: Here you have an option(first radio button) to create a database instance while the Oracle software files are installed. But most prefer to keep that a separate step in order to have more control during database creation. Select radio button "Install database software only" and click Next.
4. Grid Installation Options: Select "Single instance database installation" and click Next.
5. Select Product Language: Default English will be selected. Click Next.
6. Select Database Edition: You can get overview of the different Oracle Editions here. Select Enterprise Edition (4.5GB) and click Next.
7. Specify Installation Location: If you differ from the default paths provided then input install paths for Oracle Base and Software and click Next.
8. Create Inventory: Input the Inventory Directory and Inventory Group name if you disagree with the default, then click Next.
9. Privileged Operating System Groups: Select appropriate OS group for DBA and Operator, select the "dba" group created earlier. Click Next.
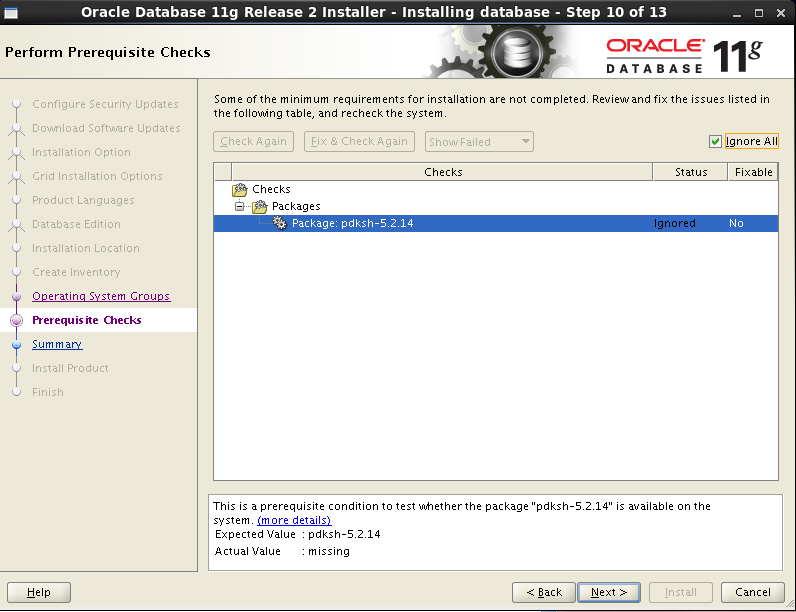
10. Perform Prerequisite Checks: Oracle does a prerequisite check on the system. Next screen reports if any prerequisites are missing.
11. Perform Prerequisite Checks: In my system there are 2 missing packages so we are seeing this screen. Install the packages or check the "Ignore All" check box.
Login as root onto the system and install one of the package #yum install elfutils-libelf-dlevel-*
12. Perform Prerequisite Checks: After install of a package click "Check Again". I prefer to ignore the pdksh(clone of the Korn shell-ksh) package. Select "Ignore All" and click Next.
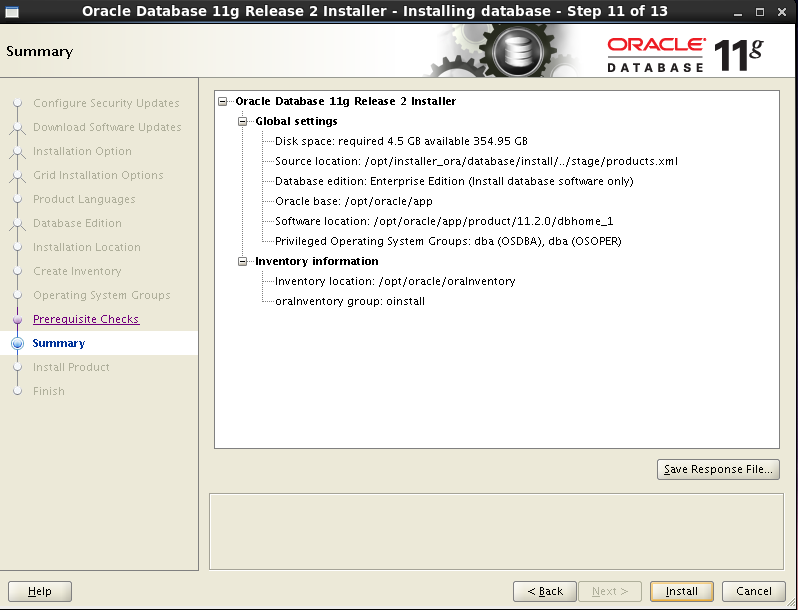
13. Summary: Review the selections and if all is fine click Next.
14. Install Product: Product is being installed. Great!!
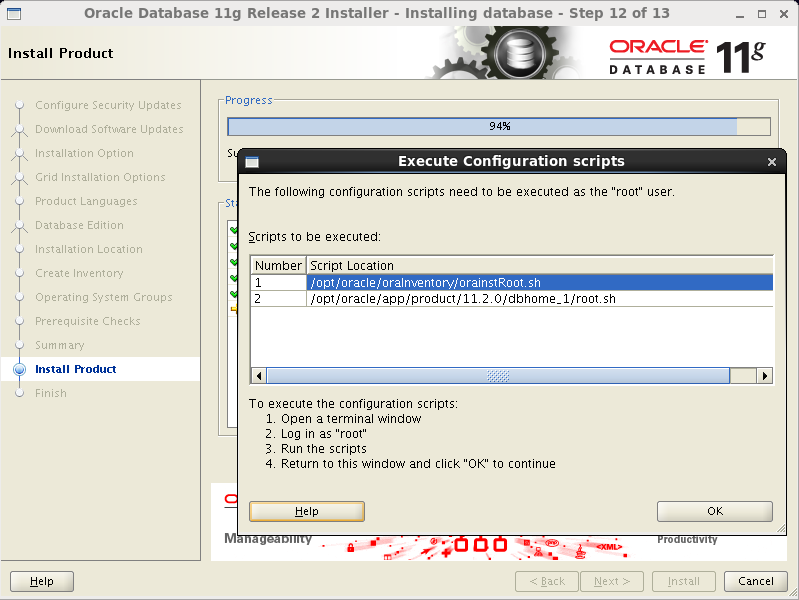
15. Install Product: Towards the end of installation you will be asked to execute couple of scripts. The path of the scripts are provided.
Login as root onto the system and execute the scripts, then click OK.
16. Finished: Hurray!! Click Close.
The Oracle Software files are now installed.
We can update the ".bash_profile" file of oracle user so that we have proper environment settings after login. Open /opt/oracle/.bash_profile and add the below lines:
Next we will create a database using Database Configuration Assistant(DBCA) in Part 3.
In part1 we did the required pre-installation tasks. This is part2 of Oracle installation, where we will install the software files. We will create a database instance in another step.
Oracle 11.2.0.3 patch is a full installer, so we don't need to install a base version like 11.2.0.1. There are a total of 7 zip files for the patch:
p10404530_112030_Linux-x86-64_1of7.zip
p10404530_112030_Linux-x86-64_2of7.zip
p10404530_112030_Linux-x86-64_3of7.zip
p10404530_112030_Linux-x86-64_4of7.zip
p10404530_112030_Linux-x86-64_5of7.zip
p10404530_112030_Linux-x86-64_6of7.zip
p10404530_112030_Linux-x86-64_7of7.zip
We need to unzip Part 1 and 2 which includes the Oracle Database and Oracle RAC. Part 3 is Oracle Grid Infrastructure, Oracle ASM, Oracle Clusterware, and Oracle Restart. Part 4 is Oracle Database Client. Part 5 is Oracle Gateways. Part 6 is Oracle Examples. Part 7 is Deinstall.
Unzip with the following command:
#unzip p10404530_112030_Linux-x86-64_1of7.zip
#unzip p10404530_112030_Linux-x86-64_2of7.zip
The contents of the zip's will be extracted to "database" folder in the current directory.
Now connect to the server box with vnc-client as the oracle user, go-to the "database" folder and start the Oracle Universal Installer(OUI) with the following command:
#./runInstaller
Oracle Universal Installer GUI will start. Below are the screenshots put in order for each step:
1. Configure Security Updates: Uncheck "I wish to receive security updates via My Oracle Support" and click Next. Click Yes to confirm.
2. Download Software Updates: Select "Skip software updates" and click Next.
3. Select Installation Option: Here you have an option(first radio button) to create a database instance while the Oracle software files are installed. But most prefer to keep that a separate step in order to have more control during database creation. Select radio button "Install database software only" and click Next.
4. Grid Installation Options: Select "Single instance database installation" and click Next.
5. Select Product Language: Default English will be selected. Click Next.
6. Select Database Edition: You can get overview of the different Oracle Editions here. Select Enterprise Edition (4.5GB) and click Next.
7. Specify Installation Location: If you differ from the default paths provided then input install paths for Oracle Base and Software and click Next.
8. Create Inventory: Input the Inventory Directory and Inventory Group name if you disagree with the default, then click Next.
9. Privileged Operating System Groups: Select appropriate OS group for DBA and Operator, select the "dba" group created earlier. Click Next.
10. Perform Prerequisite Checks: Oracle does a prerequisite check on the system. Next screen reports if any prerequisites are missing.
11. Perform Prerequisite Checks: In my system there are 2 missing packages so we are seeing this screen. Install the packages or check the "Ignore All" check box.
Login as root onto the system and install one of the package #yum install elfutils-libelf-dlevel-*
12. Perform Prerequisite Checks: After install of a package click "Check Again". I prefer to ignore the pdksh(clone of the Korn shell-ksh) package. Select "Ignore All" and click Next.
13. Summary: Review the selections and if all is fine click Next.
14. Install Product: Product is being installed. Great!!
15. Install Product: Towards the end of installation you will be asked to execute couple of scripts. The path of the scripts are provided.
Login as root onto the system and execute the scripts, then click OK.
root@jade#./orainstRoot.sh
Changing permissions of /opt/oracle/oraInventory.
Adding read,write permissions for group.
Removing read,write,execute permissions for world.
Changing groupname of /opt/oracle/oraInventory to oinstall.
The execution of the script is complete
root@jade#./root.sh
Performing root user operation for Oracle 11g
The following environment variables are set as:
    ORACLE_OWNER= oracle
    ORACLE_HOME=  /opt/oracle/app/product/11.2.0/dbhome_1
Enter the full pathname of the local bin directory: [/usr/local/bin]:
   Copying dbhome to /usr/local/bin ...
   Copying oraenv to /usr/local/bin ...
   Copying coraenv to /usr/local/bin ...
Creating /etc/oratab file...
Entries will be added to the /etc/oratab file as needed by
Database Configuration Assistant when a database is created
Finished running generic part of root script.
Now product-specific root actions will be performed.
Finished product-specific root actions.
16. Finished: Hurray!! Click Close.
The Oracle Software files are now installed.
We can update the ".bash_profile" file of oracle user so that we have proper environment settings after login. Open /opt/oracle/.bash_profile and add the below lines:
ORACLE_HOME=/opt/oracle/app/product/11.2.0/dbhome_1; export ORACLE_HOME
PATH=$ORACLE_HOME/bin:$PATH; export PATH
LD_LIBRARY_PATH=$ORACLE_HOME/lib:$LD_LIBRARY_PATH; export LD_LIBRARY_PATH
Next we will create a database using Database Configuration Assistant(DBCA) in Part 3.


No comments:
Post a Comment