Showing posts with label Java. Show all posts

How To Create a Jar for Selenium TestNg tests using Maven

Recently there was a request from the deployment team to run some GUI and API test in the production environment, and the deployment team wanted to make it as simple as possible. Since it was supposed to be deployed in multiple customer locations, and they don't want to configure the remote connections and accessibility for multiple locations across the globe. Their proposal was to give them some automated standalone tool and they run the selenium or API test and report us the test results.

In this post we'll see how to generate a jar and run TestNg tests from command line, using Maven.

1. Maven Plugin
The Maven plugin which we are interested is maven-assembly-plugin, with descriptorRef as jar-with-dependencies.
The entire pom.xml as below.
 <project xmlns="http://maven.apache.org/POM/4.0.0" xmlns:xsi="http://www.w3.org/2001/XMLSchema-instance"  
      xsi:schemaLocation="http://maven.apache.org/POM/4.0.0 http://maven.apache.org/xsd/maven-4.0.0.xsd">  
      <modelVersion>4.0.0</modelVersion>  
      <groupId>AutoTestFramework</groupId>  
      <artifactId>AutoTestFramework</artifactId>  
      <version>0.0.1-SNAPSHOT</version>  
      <dependencies>  
           <dependency>  
                <groupId>org.seleniumhq.selenium</groupId>  
                <artifactId>selenium-java</artifactId>  
                <version>3.0.1</version>  
           </dependency>  
           <dependency>  
                <groupId>org.testng</groupId>  
                <artifactId>testng</artifactId>  
                <version>6.10</version>  
                <scope>compile</scope>  
           </dependency>  
           <dependency>  
                <groupId>junit</groupId>  
                <artifactId>junit</artifactId>  
                <version>4.12</version>  
           </dependency>  
           <dependency>  
                <groupId>io.github.bonigarcia</groupId>  
                <artifactId>webdrivermanager</artifactId>  
                <version>1.5.0</version>  
           </dependency>  
           <dependency>  
                <groupId>com.sun.jersey</groupId>  
                <artifactId>jersey-client</artifactId>  
                <version>1.19.3</version>  
           </dependency>  
           <dependency>  
                <groupId>log4j</groupId>  
                <artifactId>log4j</artifactId>  
                <version>1.2.17</version>  
           </dependency>  
           <dependency>  
                <groupId>org.json</groupId>  
                <artifactId>json</artifactId>  
                <version>20160810</version>  
           </dependency>            
      </dependencies>  
      <build>  
           <pluginManagement>  
                <plugins>  
                     <plugin>  
                          <artifactId>maven-compiler-plugin</artifactId>  
                          <version>3.1</version>  
                          <configuration>  
                               <source>1.8</source>  
                               <target>1.8</target>  
                          </configuration>  
                     </plugin>  
                     <plugin>  
                          <artifactId>maven-assembly-plugin</artifactId>  
                          <version>3.0.0</version>  
                          <configuration>  
                               <descriptorRefs>  
                                    <descriptorRef>jar-with-dependencies</descriptorRef>  
                               </descriptorRefs>  
                          </configuration>  
                          <executions>  
                               <execution>  
                                    <id>make-assembly</id>  
                                    <phase>package</phase>  
                                    <goals>  
                                         <goal>single</goal>  
                                    </goals>  
                               </execution>  
                          </executions>  
                     </plugin>  
                     <plugin>  
                          <groupId>org.apache.maven.plugins</groupId>  
                          <artifactId>maven-surefire-plugin</artifactId>  
                          <version>2.16</version>  
                          <configuration>  
                               <suiteXmlFiles>  
                                    <!-- suiteXmlFile>testng.xml</suiteXmlFile-->  
                                    <!-- suiteXmlFile>suitestestng.xml</suiteXmlFile -->  
                               </suiteXmlFiles>  
                               <includes>  
                                    <include>**/Test*.java</include>  
                                    <include>**/*Tests.java</include>  
                                    <include>**/*Test.java</include>  
                                    <include>**/*TestCase.java</include>  
                               </includes>  
                          </configuration>  
                     </plugin>  
                </plugins>  
           </pluginManagement>  
           <plugins> <!-- jar with dependencies will NOT be generated without this, for #mvn package or install -->  
       <plugin>  
         <groupId>org.apache.maven.plugins</groupId>  
         <artifactId>maven-assembly-plugin</artifactId>  
       </plugin>  
     </plugins>  
      </build>  
 </project>  

2. The project structure:
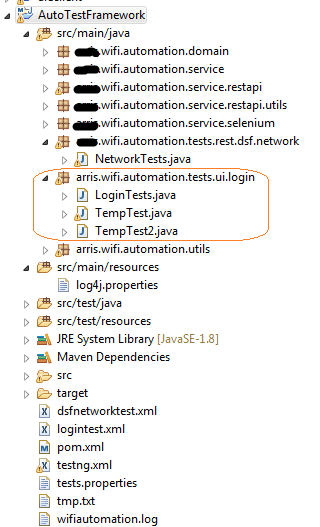
The screen-shot of my automation project as below.
Note that my test classes are in src/main/java folder, and not in src/test/java folder.
3. Generating the jar:
Right click the project in eclipse and do Maven Install or Package goal. You should see 2 jars created - one without dependencies and another with dependencies, under target folder.


4. Running the test classes:
Take the jar with dependencies to a separate location or system, and run as below.
 #java -cp AutoTestFramework-0.0.1-SNAPSHOT-jar-with-dependencies.jar org.testng.TestNG testng.xml  

The testng.xml should be in the same folder, and the running system should have same jdk version installed with which the jar was built.

Read More »

Generating SOAP webservice client stubs using Apache-CXF, Maven, Eclipse

How to create WSDL-first Java SOAP webservice client using CXF, Maven, and Eclipse.

Recently we wanted to build a Soap webservice client to invoke some operations in the production server. The client is supposed to be used by support staff and they have some determined set of operations to be performed on a daily basis. It turned out giving them a jar with command line options required for their operations.
In this post let me try to show how to generate the client stubs and invoke an operation. We will use CXF tool called wsdl2java to turn the WSDL into Java client code and Maven for dependencies and generating the code. We will use Eclipse as the IDE.

1. SOAP Service WSDL for our example:
For this example let us get the CDyne free GetStockQuote WSDL from here. You can right-click the link and save the WSDL to a location in your system.

2. Eclipse Maven Project and POM file:

  • Create a new Maven project in eclipse with artifactId as stockquote. See pom below for the options.
  • Place the downloaded WSDL at location stockquote/src/main/resources/
  • Add the maven dependencies and the required plugins as below.

 <project xmlns="http://maven.apache.org/POM/4.0.0" xmlns:xsi="http://www.w3.org/2001/XMLSchema-instance"  
      xsi:schemaLocation="http://maven.apache.org/POM/4.0.0 http://maven.apache.org/xsd/maven-4.0.0.xsd">  
      <modelVersion>4.0.0</modelVersion>  
      <groupId>com.sqadev</groupId>  
      <artifactId>stockquote</artifactId>  
      <version>0.0.1-SNAPSHOT</version>  
      <name>Stock Quote client</name>  
      <properties>  
           <cxf.version>3.1.7</cxf.version>  
           <java.version>1.8</java.version>  
      </properties>  
      <dependencies>  
           <dependency>  
                <groupId>org.apache.cxf</groupId>  
                <artifactId>cxf-rt-frontend-jaxws</artifactId>  
                <version>${cxf.version}</version>  
           </dependency>  
           <dependency>  
                <groupId>org.apache.cxf</groupId>  
                <artifactId>cxf-rt-transports-http</artifactId>  
                <version>${cxf.version}</version>  
           </dependency>  
      </dependencies>  
           <build>  
           <plugins>  
           <!--Generate Java stub from WSDL at build time -->  
                <plugin>  
                     <groupId>org.apache.cxf</groupId>  
                     <artifactId>cxf-codegen-plugin</artifactId>  
                     <version>${cxf.version}</version>  
                     <executions>  
                          <execution>  
                               <id>generate-sources</id>  
                               <phase>generate-sources</phase>  
                               <configuration>  
                                    <sourceRoot>${basedir}/generated/cxf/src/main/java</sourceRoot>  
                                    <wsdlOptions>  
                                         <wsdlOption>  
                                              <wsdl>${basedir}/src/main/resources/delayedstockquote.wsdl</wsdl>  
                                              <extraargs>  
                                                   <extraarg>-client</extraarg>  
                                                   <extraarg>-impl</extraarg>  
                                                   <extraarg>-verbose</extraarg>  
                                              </extraargs>  
                                         </wsdlOption>  
                                    </wsdlOptions>  
                               </configuration>  
                               <goals>  
                                    <goal>wsdl2java</goal>  
                               </goals>  
                          </execution>  
                     </executions>  
                </plugin>  
                <!-- Add the generated sources, this avoids having to copy generated sources to build location -->  
       <plugin>  
         <groupId>org.codehaus.mojo</groupId>  
         <artifactId>build-helper-maven-plugin</artifactId>  
         <version>1.12</version>  
         <executions>  
           <execution>  
             <id>add-source</id>  
             <phase>generate-sources</phase>  
             <goals>  
               <goal>add-source</goal>  
             </goals>  
             <configuration>  
               <sources>  
                 <source>${basedir}/generated/cxf/src/main/java</source>  
               </sources>  
             </configuration>  
           </execution>  
         </executions>  
       </plugin>  
           </plugins>  
           </build>  
 </project>  

  • If you get undefined element declaration exception, please refer here to fix it.
  • We use cxf-codegen-plugin to run wsdl2java to generate our Java code into ${basedir}/generated/cxf/src/main/java
  • In eclipse java code is generated using Maven generate-sources. Right click the project stockquote -> Run as -> Maven generate-sources.
  • On successful build the source files will be generated in the new folder /generated/cxf/src/main/java.
  • Four client are generated as DelayedStockQuoteHttpGet_DelayedStockQuoteHttpGet_Client, ...HttpPost_Client and ...Soap_Client, ...Soap12_Client version. See eclipse screenshot below:


3. Running the Client:
Now that we have the client code generate, let us try to check if it's working.
Update one of the client code to check if the request/response works fine.
Sample code after updating DelayedStockQuoteSoap_DelayedStockQuoteSoap_Client:

................
 DelayedStockQuote ss = new DelayedStockQuote(wsdlURL, SERVICE_NAME);  
     DelayedStockQuoteSoap port = ss.getDelayedStockQuoteSoap();   
     {  
     System.out.println("Invoking getQuote...");  
     java.lang.String _getQuote_stockSymbol = "VZ";  
     java.lang.String _getQuote_licenseKey = "0";  
     com.cdyne.ws.QuoteData _getQuote__return = port.getQuote(_getQuote_stockSymbol, _getQuote_licenseKey);  
     System.out.println("getQuote.result = " + _getQuote__return.getCompanyName());  
     System.out.println("getQuote.result.Verizon.lastTradeAmt = " + _getQuote__return.lastTradeAmount);  
     }  
     {  
     System.out.println("Invoking getQuoteDataSet...");  
     java.lang.String _getQuoteDataSet_stockSymbols = "";  
     java.lang.String _getQuoteDataSet_licenseKey = "";  
     com.cdyne.ws.GetQuoteDataSetResponse.GetQuoteDataSetResult _getQuoteDataSet__return = port.getQuoteDataSet(_getQuoteDataSet_stockSymbols, _getQuoteDataSet_licenseKey);  
     System.out.println("getQuoteDataSet.result=" + _getQuoteDataSet__return);  
     }  
................

In eclipse right click on the file and select "Run As" --> "Java Application".
Sample result as below:
 Nov 12, 2016 11:52:45 PM org.apache.cxf.wsdl.service.factory.ReflectionServiceFactoryBean buildServiceFromWSDL  
 INFO: Creating Service {http://ws.cdyne.com/}DelayedStockQuote from WSDL: file:/C:/mysoftware/eclipse_wrkspce/stockquote/src/main/resources/delayedstockquote.wsdl  
 Invoking getQuote...  
 getQuote.result = Verizon Communications Inc. Com  
 getQuote.result.Verizon.lastTradeAmt = 46.69  
 Invoking getQuoteDataSet...  
 getQuoteDataSet.result=com.cdyne.ws.GetQuoteDataSetResponse$GetQuoteDataSetResult@9573584  
 Invoking getQuickQuote...  
 getQuickQuote.result=0  

Looks like our client is fetching results...
Src code in GitHub.
Next(in another post) we will see how we can build a jar with cmd line options to make some soap request/response.
Read More »

CXF wsdl2java - undefined element declaration 's:schema' - PluginExecutionException

Recently I got a third party generated wsdl, and when I try to use wsdl2java cxf-codegen-plugin in maven eclipse it shows the below error in the wsdl:

undefined element declaration 's:schema' (org.apache.cxf:cxf-codegen-plugin:3.1.7:wsdl2java:generate-sources:generate-sources)

After some googling it seems to be a common issue with JAXB and .NET WSDL.

Here is the problematic part of the WSDL:
 <s:element minOccurs="0" maxOccurs="1" name="GetQuoteDataSetResult">  
  <s:complexType>  
   <s:sequence>  
    <s:element ref="s:schema"/>  
    <s:any/>  
   </s:sequence>  
  </s:complexType>  
 </s:element>  

The easier solution seems to be to download the WSDL and modify the schema in order to generate the stub. Here is what I did to the WSDL as per the suggestion:
 <s:element minOccurs="0" maxOccurs="1" name="GetQuoteDataSetResult">  
        <s:complexType>  
         <s:sequence>  
          <!-- s:element ref="s:schema" /-->  
          <s:any minOccurs="2" />  
         </s:sequence>  
        </s:complexType>  
 </s:element>  

After the change the maven plugin ran successfully to generate the Java code.

Ref: http://cxf.547215.n5.nabble.com/Thrown-by-JAXB-undefined-element-declaration-s-schema-td554126.html
Read More »

BDD Cucumber - Might Not be for a regular QA!

BDD Cucumber used with Selenium seems to be quite popular now a days for Automation framework. We have been using a BDD framework with Selenium for our Automation including Integration Tests. The tests are being added by the test team and dev team and they are run as part of build process(CI).
Though it is good that everybody, starting from the customer to the higher executives can read the tests, as the steps are written in (simple?) human understandable language - Gherkin, but BDD has its own limitations. Here are a few of the drawbacks that we encountered during our journey:

1. Steep Learning curve: A QA member is not a programming expert, else he should be in development. In our test team we had a mix of Java programmer(basic) and non-programmers. We really had a tough time explaining about Cucumber BDD to the non-programmers, and they still are not able to write tests properly. Imagine a non-programmer, who never has written a piece of code has to learn Java, Selenium, Cucumber and the BDD style of writing tests. Instead he could have simply learnt Java, Selenium and start adding tests with TestNG. In TestNG or Junit you don't need to worry about Given/When/Then. As for the programmer they still make mistakes writing proper Given/When/Then.

2. Translating test cases to BDD "scenario" is not fun: When we started automating, we already had more than 2000 odd testcases for our product, and those are not written thinking of BDD. We had to update/edit the test steps, split  testcases, carve out new steps to be inline with BDD. This is a huge overhead, we had to spend a considerable amount of time on this. Also when we write a new testcase we might actually think in plain English and not in BDD style. Writing testcases with BDD mindset is something which will come with good experience.
Again convention says, when we create a new step in Cucumber, we should make it generic in order to to be re-usable. With this in mind, we try to group similar tests in one "Feature" file. Again an overhead, scanning though different testcases to pick the similar ones. We have to do this because the less the files the better, and then people don't expect to write one "Feature" file for each testcase.

3. Limited Annotations as compared to other frameworks(TestNg, Junit): Cucumber has "Hooks" like @Before, @After. These are called for each "Scenario" from the "Feature" file. Annotations like @BeforeClass, @AfterClass, @BeforeSuite, etc from TestNg are not available in Cucumber. We know this could be achieved in Cucumber with "Runtime.getRuntime().addShutdownHook...", but wouldn't it be better if something is available out of the box? Also what about parallel test execution, of-course we can do this with Selenium, but TestNG and Junit already has this option compared to Cucumber.

4. The Gherkin is not-so-simple to be understood by stakeholder/customers: The Given-When-Then are usually written by technical person either test or dev member. Now our customer is a non-technical, business person who might not think the way as a technical guy. This itself defeats the main purpose of Cucumber that the stakeholder can read and understand Cucumber language. Also how many people other than a QA guy, cares about test steps. Unless there is some critical customer issue, nobody wants to go through the test steps in detail, even a developer have to be reminded multiple times to review a testcase.
Now for argument sake, lets say our customer is a technical person. How likely is it that he knows BDD Steps? Is he going to learn cucumber-BDD for reviewing your tests? Not yet, until he is forced upon :).

5. DuplicateStepDefinitionException seems to occur often: We have been seeing this often times. This occurs when we have duplicate methods in different class files and its likely to occur as different testcases have similar steps. Best solution to avoid this is to checkout all tests and run it locally before committing yours. The problem is people doesn't follow the solution, out of laziness or are in a hurry to automate more :).

Finally, saying all this drawbacks does-not mean that we are stopping with Cucumber. We are loving every bit of it and with each and every issue we are happy we learnt something new today. After all we are engineers and we keep learning!!!
Read More »

TestNG Data Provider - Data Driven Automation Testing

TestNg DataProvider is used for Data Driven testing in a Test Automation Framework. As the name implies DataProvider supplies data to our test methods. It helps us to execute a single test method with multiple sets of data.
DataProvider can also be used for getting data from file or database and passing to our test methods, we will see that in another post.

A DataProvider is a method of our class that must returns an array of array of objects(object[][]). This method is supposed to be annotated with @DataProvider and a 'name' attribute.
In our test method with @Test annotation, we specify the DataProvider with the 'dataProvider' attribute with a name that corresponds to our 'name' attribute in the DataProvider method.

The DataProvider method is usually defined and looked up in the same class as the test method. But we find it more helpful if we define it in another class, in that case it needs to be a static method. If we define DataProvider in a separate class, we specify the class name with 'dataProviderClass' attribute in our @Test annotation. See example (1) below.

A DataProvider method can return one of the follwing:
- An array of array of objects(Object[][]) where the first dimension's size is the number of times the test method will be invoked and the second dimension size contains an array of objects. The second dimension's array is what we define as parameter in our test method and must be compatible with the parameter types of the test method. See example (1) below for more clarity.
- An Iterator <Object[]>. The java.util.Iterator used in here lets us create our test data lazily. If we have a lot of parameter sets to pass to the method and we don't want to create all of them upfront, which is done incase we are using double array Object, we should use an Iterator. TestNg allows us to use an Iterator on the DataProvider so that the set of parameters are instantiated and returned when the test method gets invoked each time. This is called lazy initialization, and the idea is to create an object when required and not before. Example (5) below.

Here we will see a few examples using DataProviders. Just to make this post solely for TestNg DataProviders, we have not included any Selenium code here.

1) Lets start with passing simple parameters - we will pass 2 parameters in one test method and 3 parameters in another test.
We will define the DataProvider method in separate class.
package com.testng.test;
import org.testng.annotations.DataProvider;

public class Providers {
	@DataProvider(name = "provider1")
	public static Object[][] provideData() {
		return new Object[][] { 
			{ 1, 100 }, 
			{ 5, 500 }, 
			{ 10, 1000 } 
		};
	}
	
	@DataProvider(name = "provider2")
	public static Object[][] provideSomething() {
		return new Object[][]{
				{1,"Delhi","DEL"},
				{2,"Mumbai","MAH"}
		};
	}
}

The class which uses the providers:

package com.testng.test;
import org.testng.annotations.Test;

public class CheckDataProvider {
	
	@Test(dataProvider = "provider1", dataProviderClass = Providers.class)
	public void testData1(int inNum, int expect) {
		System.out.println("Number: " + (inNum * 100) + " Expected: " + expect);
	}

	@Test(dataProvider = "provider2", dataProviderClass = Providers.class) 
	public void testData2(int cityId, String city, String state) {
		System.out.println("City Id: " + cityId + " City: " + city + " State: " + state);
	}
}


Run the CheckDataProvider class as TestNG Test. Below is the output:
[TestNG] Running:
  C:\Users\sarats\AppData\Local\Temp\testng-eclipse--714784067\testng-customsuite.xml

Number: 100 Expected: 100
Number: 500 Expected: 500
Number: 1000 Expected: 1000
City Id: 1 City: Delhi State: DEL
City Id: 2 City: Mumbai State: MAH
PASSED: testData1(1, 100)
PASSED: testData1(5, 500)
PASSED: testData1(10, 1000)
PASSED: testData2(1, "Delhi", "DEL")
PASSED: testData2(2, "Mumbai", "MAH")

===============================================
    Default test
    Tests run: 5, Failures: 0, Skips: 0
===============================================

===============================================
Default suite
Total tests run: 5, Failures: 0, Skips: 0
===============================================
We see that each of the test method is run the number of times in our Object[][] array.


2) Passing a List: Returning a List from the DataProvider is usually done when we read input data from a file and DataProvider is used to pass on the data to the test method. Method for reading data from files are better placed in another class and then from within the DataProvider method we can just call the method.
We can iterate over the list in the DataProvider method(e.g. listProvider2) and return an Object[][], or we can pass on the List to the test method.
Below we will see both the ways, for the test method "listTesting1" we are just populating a List in the DataProvider method(listProvider1) and passing the list to the test method. We can also pass other collection objects like maps.
For test method "listTesting2" it is getting values from DataProvider(listProvider2) one at a time. Here the DataProvider method takes care of iterating over the list, which is usually the way we read data from a file and DataProvider passes on the data to test method one after another.
 package com.testng.test;  
 import java.util.ArrayList;  
 import java.util.List;  
 import org.testng.annotations.DataProvider;  
 import org.testng.annotations.Test;
 
 public class ListDataProvider {  
      @DataProvider(name = "listProvider1")  
      public static Object[][] provideListData() {  
            List<String> list = new ArrayList<String>();  
           for (int i=1; i<=5; i++) {  
                list.add("data" + i);  
           }  
           return new Object[][] { { list } };  
      }  
 
     @DataProvider(name = "listProvider2")  
      public static Object[][] provideListData2() {  
            List<String> list = new ArrayList<String>();  
           for (int i=1; i<=5; i++) {  
                list.add("data" + i);  
           }  
           String[][] ret = new String[list.size()][];  
           for (int i=0; i<list.size(); i++) {  
                ret[i] = new String[]{list.get(i)};  
           }  
           return ret;  
      }  

      @Test(dataProvider = "listProvider1")  
      public void listTesting1(List<String> list) {  
           System.out.println("#### " + Thread.currentThread().getStackTrace()[1].getMethodName() + " ####");  
           for (String str : list) {  
                System.out.println(str);  
           }  
      }  

      @Test(dataProvider = "listProvider2")  
      public void listTesting2(String str) {  
           System.out.println("#### " + Thread.currentThread().getStackTrace()[1].getMethodName() + " ####");  
           System.out.println("test data: " + str);  
      }  
 }  

Run the ListDataProvider class as TestNG Test, and below is the output:
[TestNG] Running:
  C:\Users\sarats\AppData\Local\Temp\testng-eclipse-788397593\testng-customsuite.xml

#### listTesting1 ####
data1
data2
data3
data4
data5
#### listTesting2 ####
test data: data1
#### listTesting2 ####
test data: data2
#### listTesting2 ####
test data: data3
#### listTesting2 ####
test data: data4
#### listTesting2 ####
test data: data5
PASSED: listTesting1([data1, data2, data3, data4, data5])
PASSED: listTesting2("data1")
PASSED: listTesting2("data2")
PASSED: listTesting2("data3")
PASSED: listTesting2("data4")
PASSED: listTesting2("data5")

===============================================
    Default test
    Tests run: 6, Failures: 0, Skips: 0
===============================================

===============================================
Default suite
Total tests run: 6, Failures: 0, Skips: 0
===============================================


3) Provide data depending on the calling test method: If same DataProvider is used to supply data to several test methods we can use "java.lang.reflect.Method" and provide data according to the calling method. DataProvider method can take a java.lang.reflect.Method as first parameter, in this case TestNG will pass the calling test method for this first parameter.
 package com.testng.test;
  
 import java.lang.reflect.Method;  
 import java.util.ArrayList;  
 import java.util.List;  
 import org.testng.annotations.DataProvider;  
 import org.testng.annotations.Test;  

 public class DataProviderMethodParam {  
      @DataProvider(name = "ProviderMethodParam")  
      public static Object[][] provideListData(Method method) {  
            List<String> list = new ArrayList<String>();  
           for (int i=1; i<=5; i++) {  
                list.add("data" + i);  
           }  
           if (method.getName().equals("listTesting1")) {  
           return new Object[][] { { list } };  
           }  
           else if (method.getName().equals("listTesting2")){  
                String[][] ret = new String[list.size()][];  
                for (int i=0; i<list.size(); i++) {  
                     ret[i] = new String[]{list.get(i)};  
                }  
                return ret;  
           }  
           return null;  
      }  

      @Test(dataProvider = "ProviderMethodParam")  
      public void listTesting1(List<String> list) {  
           System.out.println("#### " + Thread.currentThread().getStackTrace()[1].getMethodName() + " ####");  
           for (String str : list) {  
                System.out.println(str);  
           }  
           System.out.println("**********************************");  
      }  

      @Test(dataProvider = "ProviderMethodParam")  
      public void listTesting2(String str) {  
           System.out.println("#### " + Thread.currentThread().getStackTrace()[1].getMethodName() + " ####");  
           System.out.println("test data: " + str);  
      }  
 }  

Run the class DataProviderMethodParam as TestNG Test, and below is the output:
[TestNG] Running:
  C:\Users\sarats\AppData\Local\Temp\testng-eclipse--1473820315\testng-customsuite.xml

#### listTesting1 ####
data1
data2
data3
data4
data5
**********************************
#### listTesting2 ####
test data: data1
#### listTesting2 ####
test data: data2
#### listTesting2 ####
test data: data3
#### listTesting2 ####
test data: data4
#### listTesting2 ####
test data: data5
PASSED: listTesting1([data1, data2, data3, data4, data5])
PASSED: listTesting2("data1")
PASSED: listTesting2("data2")
PASSED: listTesting2("data3")
PASSED: listTesting2("data4")
PASSED: listTesting2("data5")

===============================================
    Default test
    Tests run: 6, Failures: 0, Skips: 0
===============================================

===============================================
Default suite
Total tests run: 6, Failures: 0, Skips: 0
===============================================


4) Provide data depending on ITestContext: We can use 'org.testng.ITestContext' in the DataProvider method to determine the runtime parameters of the calling test method. Depending on the parameter we can choose what data to provide. Here we will see how to pass data depending on TestNg's 'groups' attribute.
 package com.testng.test;  
   
 import java.util.Arrays;  
 import org.testng.ITestContext;  
 import org.testng.annotations.DataProvider;  
 import org.testng.annotations.Test;  
   
 public class DataProviderITestContext {  
    
  @DataProvider(name = "dpContext")  
  public Object[][] provided(ITestContext context) {  
   Object[][] result = null;  
   int numTimes = 5;  
   String[] groups = context.getIncludedGroups();  
   System.out.println(context.getName());  
   System.out.println(Arrays.toString(groups));  
     
   for (String grp: groups) {  
    if (grp.equalsIgnoreCase("smoke-test")) {  
     numTimes = 2;  
     break;  
    }  
   }  
   
   result = new Object[numTimes][];  
   for(int i=0;i<numTimes;i++) {  
    result[i] = new Object[] {new Integer(100 + i)};  
   }  
   return result;  
  }  
    
  @Test(dataProvider = "dpContext", groups = {"smoke-test"})  
  public void smokeTesting(int num) {  
   System.out.println("Data provided: " + num);  
  }  
    
  @Test(dataProvider = "dpContext", groups = {"regress-test"})  
  public void regressTesting(int num) {  
   System.out.println("Data provided: " + num);  
  }  
   
 }  

Below is the testng.xml:
 <?xml version="1.0" encoding="UTF-8"?><!DOCTYPE suite SYSTEM "http://testng.org/testng-1.0.dtd" >  
 <suite name="test-Dataprovider" verbose="1">  
  <test name="example-DP">  
   <groups>  
     <run>  
       <include name="smoke-test" />  
     </run>  
   </groups>  
   <classes>  
     <class  
     name="com.testng.test.DataProviderITestContext" />  
   </classes>  
  </test>  
 </suite>  

Below is the output:
[TestNG] Running:
  D:\eclipse_workspace\TestngWDFramework\testng.xml

example-DP
[smoke-test]
Data provided: 100
Data provided: 101

===============================================
test-Dataprovider
Total tests run: 2, Failures: 0, Skips: 0
===============================================

5) Lazy Data Provider using Iterator: A DataProvider method returns an Iterator instead of an array of arrays of objects. Whenever TestNg require the next set of parameters, it can instantiate the parameter and return it to the test method.
We will see the example in another post.
Read More »

How To Check Prime Number with Java

Prime number is a natural number greater than 1 and only divisible by 1 or itself, i.e. a prime number has only two factors, 1 and itself. The number 2 is the smallest and only even prime number. 1 is excluded as a prime number.
In order to check if a number is prime we should find if there is any divisor other than 1 or itself. We can find this by dividing the number(say n) by each number between 2 and n-1. For e.g. in order to check if 13 is a prime number, we need to check if 13 is divisible by 2 through 12. If remainder is 0 for any one division then the number is not prime.

Trying a number n by all numbers between 2 and n-1 is very time consuming, and luckily we have a faster approach. It is only necessary to test the factors between 2 and the square root of n in order to check a prime number.
For e.g. if n=61, we need to test only the numbers between 2 and sqrt(61).
sqrt(61) = 7.
61 is not evenly divisible by 2,3,4,5,6,7, so 61 is a prime number.

Again, to further save time, we can test with only the prime factor from the list(2,3,4,5,6,7). For e.g. in the list (2,3,4,5,6,7), we should try with only the prime numbers 2,3,5,7.

Sample Java program to check if a number is prime and print all prime numbers up-to the number:

package com.examples;
import java.util.Scanner;

public class PrimeNos {

 public static void main(String[] args) {
  Scanner in = new Scanner(System.in);
  System.out.println("Enter a number to check prime: " );
  int n = in.nextInt();
  if (checkPrime(n))
   System.out.println("Number is prime");
  else 
   System.out.println("Number Not prime....");
  
  System.out.print("The prime numbers till " + n + ": ");
  for (int i=2; i<=n;i++){
   if (checkPrime(i))
    System.out.print(i + " ");
  }
 }
 
 public static Boolean checkPrime(int n) {
  int sqt = (int) Math.sqrt(n);
  for (int i=2; i<=sqt; i++) {
   Boolean test = checkPrime(i); //save more time, use only prime factors
   if (test) {
    int result = n % i;
    if (result == 0){ 
     return false;
    }
   }
  }
  return true;
 }
}


Output:
Enter a number to check prime: 29
Number is prime
The prime numbers till 29: 2 3 5 7 11 13 17 19 23 29 

Read More »

How To Use Page Factory in Selenium Webdriver

Writing Selenium script for web automation UI testing is easy, we just need to find elements and perform the operations. This seems to be fine when the pages are less or our Application Under Test(AUT) is small. The problem starts when the pages and the elements start growing in our AUT and several different scripts use the same page and  the same elements in their respective scripts. This results in duplicated code, and the disadvantage now is that our Selenium testing project is error prone and maintainability becomes cumbersome. The developer changes an element-id in one of the page and several tests start to fail, consequently we need to go and update several selenium scripts for a single change in an element-id. This is surely time consuming and boring work for a test developer.

Introducing Page Factory in Selenium Automation Testing which will address our problems above. Below is a short Selenium tutorial on Page Factory.

Page Object Pattern/Model saves us from this maintainability issue and helps us model our test in a very robust way. In this model, we define all Web Elements of a page and the methods that operate on these elements in a single class file. The class encapsulates all the logic about how to perform certain actions on the page.
Apart from the advantage of eliminating duplicate code it has other benefits like:
- Less and optimized code, easy to maintain, since all elements of a page are stored in a single class.
- Code re-usability improved, as the test code and the page objects are separated.
- Easy adding new tests, since we already have all locators defined. Also with the help of the "methods" in the page object, anyone can write test without the knowledge of the locators.

PageFactory Class is an optimized extension of the PageObject design pattern. It is used to initialize the web elements of the PageObject with the initElements() method, we don't need to use 'FindElement' or 'FindElements'. The PageFactory.initElements() static method takes the driver instance and the class type, and returns a Page Object with it’s fields fully initialized.
Annotations are used to supply descriptive names of Web Elements to improve code readability. Annotation @FindBy is used to identify Web Elements in the page. Location strategies, like id, name, xpath or className, are all available using the @FindBy attribute.
Annotation @CacheLookup can also be used to cache the element once its located. It is best applied to Web Elements to indicate that it never changes. Otherwise every time you use a Web Element the WebDriver will go and search it again.

Let us try to write a sample test using PageFactory design.
We start by creating 'PageFactory' classes for each of the pages in our AUT(http://newtours.demoaut.com/). Methods are are also implemented relevant to our pages for certain required operations on the page.

1. Our first PageFactory Class "NewToursHomePage.java".
package com.page.factory.pages;

import org.openqa.selenium.WebDriver;
import org.openqa.selenium.WebElement;
import org.openqa.selenium.support.FindBy;
import org.openqa.selenium.support.How;
import org.openqa.selenium.support.PageFactory;

public class NewToursHomePage {

 private final WebDriver driver;

 @FindBy(how = How.LINK_TEXT, using = "SIGN-ON")
 private WebElement signonLink;

 @FindBy(linkText = "REGISTER")
 // Another way of writing @FindBy
 private WebElement registesLink;

 // Constructor for this page object, which includes initElements() method to
 // instantiate all Web Elements in this page
 public NewToursHomePage(WebDriver driver) {
  this.driver = driver;
  PageFactory.initElements(driver, this); //instantiating all elements 
 }

 public String getHomePageTitle() {
  return driver.getTitle();
 }

 public void clickSignOn() {
  signonLink.click();
 }

 public NewToursSignonPage clickSignOn2() {
  signonLink.click();
  return PageFactory.initElements(driver, NewToursSignonPage.class);
 }
}

2. Our next "PageFactory" class "NewToursSignonPage.java".
package com.page.factory.pages;

import org.openqa.selenium.WebDriver;
import org.openqa.selenium.WebElement;
import org.openqa.selenium.support.CacheLookup;
import org.openqa.selenium.support.FindBy;
import org.openqa.selenium.support.PageFactory;

public class NewToursSignonPage {

 private final WebDriver driver;
 
 //We are using @CacheLookup annotation
 @FindBy(name="userName") @CacheLookup
 private WebElement userName;
 
 @FindBy(name="password") @CacheLookup
 private WebElement pwd;
 
 @FindBy(name="login")
 private WebElement loginButton;
 
 public NewToursSignonPage(WebDriver driver) {
  this.driver = driver;
 }
 
 public String signOnTitle() {
  return driver.getTitle();
 }
 
 public NewToursFlightFinderPage signOn(String user, String pass) {
  userName.sendKeys(user);
  pwd.sendKeys(pass);
  loginButton.click();
  return PageFactory.initElements(driver, NewToursFlightFinderPage.class); 
 }
}

3. Our last(for this example) "PageFactory" class "NewToursFlightFinderPage.java".
package com.page.factory.pages;

import org.openqa.selenium.WebDriver;

public class NewToursFlightFinderPage {
 
 private final WebDriver driver;

 public NewToursFlightFinderPage(WebDriver driver) {
  this.driver = driver;
 }
 
 public String getFltFinderTitle() {
  return driver.getTitle();
 }
}

4. Here is the sample code to test our "PageFactory" classes. This is written as a TestNg test class.
package com.page.factory.test;

import java.util.concurrent.TimeUnit;
import org.openqa.selenium.WebDriver;
import org.openqa.selenium.firefox.FirefoxDriver;
import org.openqa.selenium.support.PageFactory;
import org.testng.annotations.AfterClass;
import org.testng.annotations.BeforeClass;
import org.testng.annotations.Test;

import com.page.factory.pages.NewToursFlightFinderPage;
import com.page.factory.pages.NewToursHomePage;
import com.page.factory.pages.NewToursSignonPage;

public class TestingPageFactory {
 private WebDriver driver;
 private String testurl = "http://newtours.demoaut.com/";
 private String username= "test";
 private String password= "test";
 NewToursHomePage homePage;
 NewToursSignonPage signOnPage;
 NewToursFlightFinderPage fltFinderPage;

 @BeforeClass
 public void setup() {
  driver = new FirefoxDriver();
  driver.manage().timeouts().implicitlyWait(10, TimeUnit.SECONDS);
  driver.get(testurl);
  homePage = new NewToursHomePage(driver); //this page elements are instantiated in constructor
 }

 @Test
 public void test123() throws InterruptedException {
  System.out.println(driver.getTitle());
  System.out.println(homePage.getHomePageTitle());
  homePage.clickSignOn();
  
  //instantiate NewToursSignonPage and initialize elements of the SignOn page class.
  signOnPage = PageFactory.initElements(driver, NewToursSignonPage.class);
  //Above line can be replaced by calling clickSignOn2(), as below
        //signOnPage = homePage.clickSignOn2();
          
        System.out.println(driver.getTitle());
  System.out.println(signOnPage.signOnTitle());
  
  fltFinderPage = signOnPage.signOn(username, password);
  
  System.out.println(driver.getTitle());
  System.out.println(fltFinderPage.getFltFinderTitle()); 
  Thread.sleep(5000);
 }
 
 @AfterClass
 public void finish() {
  driver.quit();
 }
}

5. Below is the screenshot of the package structure in Eclipse:

6. Run the "TestingPageFactory.java" as "TestNG Test" in Eclipse. Below is the output:
[TestNG] Running:
  C:\xxxx\xxxx\xxxx\xxxx\testng-eclipse-1761636653\testng-customsuite.xml

Welcome: Mercury Tours
Sign-on: Mercury Tours
Find a Flight: Mercury Tours:
PASSED: test123

===============================================
    Default test
    Tests run: 1, Failures: 0, Skips: 0
===============================================

===============================================
Default suite
Total tests run: 1, Failures: 0, Skips: 0
===============================================

[TestNG] Time taken by org.testng.reporters.jq.Main@b2771: 71 ms
[TestNG] Time taken by org.testng.reporters.XMLReporter@1882d18: 20 ms
[TestNG] Time taken by org.testng.reporters.EmailableReporter2@48ffbc: 20 ms
[TestNG] Time taken by org.testng.reporters.JUnitReportReporter@152e7a4: 20 ms
[TestNG] Time taken by [FailedReporter passed=0 failed=0 skipped=0]: 0 ms
[TestNG] Time taken by org.testng.reporters.SuiteHTMLReporter@135707c: 230 ms

Now, go ahead and create some Page Factory in your Selenium Automation testing project.
If you like this short tutorial on Selenium Page Factory, please put a comment below.
Read More »

How To Find The First Non-Repeated Character In a String

Dealing with Strings is required in any programming language, and most of the programming books will have a chapter on String. If you are preparing for technical interviews be prepared to get some questions on Strings. Finding the first non-repeated character is usually asked during interviews and coding tests in Java programming.
Here is an sample Java program to find first non-repeated character in a String. We are not using any of the java.util.Collection classes here, instead we just traverse a Character array multiple times until we get our desired character. Keep it as simple as it could be :)

Program "NonRepeatChar.java":
package com.examples;;

public class NonRepeatChar {
 public static void main(String[] args) {
  String str = "madam";
  char c = getFirstNonRepeatChar(str);
  System.out.println("The test string is: " + str);
  if (c == ' ') {
   System.out.println("All char are repeated..");
  } else {
   System.out.println("The first non-repeated char is: " + c);
  }
 }

 public static Character getFirstNonRepeatChar(String s) {
  char[] charStr = s.toCharArray();
  int count = 0;
  for (int i = 0; i <= charStr.length - 1; i++) {
   count = 0;
   for (int j = charStr.length - 1; j >= 0; j--) {
    if (charStr[i] == charStr[j]) {
     count++;
    }
   }
   if (count == 1) {
    return charStr[i];
   }
  }
  return ' ';
 }
}

Output with 2 different test strings:

The test string is: madam
The first non-repeated char is: d

The test string is: ramram
All char are repeated..


Read More »

Java Dynamic Sized Arrays - Vector Class Example

Vector is an array like structure whose size could be changed dynamically. We can keep on adding elements to it without worrying about its size. Whenever there is an addition of new element to the Vector, it checks the capacity and if required it reallocates a new array with new size. This requires copying the existing data to the new array. The Vector class is found in the java.util package.
Vector is also similar to java.util.ArrayList of the Collection Framework, with few differences - that the methods of Vector are synchronized and vectors class has legacy method that are not part of collections framework e.g. addElement() and elementAt().

An example program with few methods of Vector Class:
package com.examples;

import java.util.Enumeration;
import java.util.Iterator;
import java.util.Vector;

public class VectorExample1 {
 public static void main(String[] args) {
  //Default constructor of Vector
  Vector vec1 = new Vector();
  System.out.println("Initial Size: " + vec1.size() + ", Initial Capacity: " + vec1.capacity());
  System.out.println("Is vector empty: " + vec1.isEmpty());
  vec1.add(new Integer(5));
  vec1.addElement(new Integer(10));
  System.out.println("After adding 2 elements in vector, vec1 is: " + vec1);
  System.out.println("Current Size: " + vec1.size() + ", Capacity: " + vec1.capacity());
  System.out.println("Clearing the vector... ");
  vec1.clear();
  System.out.println("After clearing - Size: " + vec1.size() + " Capacity: " + vec1.capacity());
  
  //Constructor with initital size 5 and increment capacity 2
  Vector vec2 = new Vector(5,2);
  System.out.println("********************************\n");
  
  //Constructor with only initital size, and type argument
  Vector vec3 = new Vector(2);
  vec3.add(new Integer(5));
  vec3.add(new Integer(15));
  vec3.add(new Integer(25));
  vec3.add(new Integer(45));
  vec3.add(3, new Integer(35)); //add at index postion 3
  System.out.print("Elements in vector vec3: ");
  for (Integer v: vec3) System.out.print(v + " "); 
  System.out.println();
  System.out.println("Get by index, at position 2: " + vec3.get(2));
  vec3.remove(2);//Remove element at index 2
  System.out.println("Get by index after remove, at position 2: " + vec3.get(2));
  System.out.println("Iterating through vector vec3 using Enumeration:");
  Enumeration en = vec3.elements();
  while(en.hasMoreElements()) System.out.print(en.nextElement() + " ");
  System.out.println("\n********************************\n");

  //Cloning vec3 to vec4
  Vector vec4 = (Vector) vec3.clone();
  System.out.println("First elemt of vec4(cloned): " + vec4.firstElement());
  System.out.println("Last elemt of vec4(cloned): " + vec4.lastElement());
  System.out.println("Iterating through vector vec4 using Iterator:");
  Iterator vit = vec4.iterator(); 
  while(vit.hasNext()) System.out.print(vit.next() + " "); 
 }
}

Below is the output of the program:
Initial Size: 0, Initial Capacity: 10
Is vector empty: true
After adding 2 elements in vector, vec1 is: [5, 10]
Current Size: 2, Capacity: 10
Clearing the vector... 
After clearing - Size: 0 Capacity: 10
********************************

Elements in vector vec3: 5 15 25 35 45 
Get by index, at position 2: 25
Get by index after remove, at position 2: 35
Iterating through vector vec3 using Enumeration:
5 15 35 45 
********************************

First elemt of vec4(cloned): 5
Last elemt of vec4(cloned): 45
Iterating through vector vec4 using Iterator:
5 15 35 45 

Read More »

3 Ways To Access Database from a Selenium Automation Framework

Accessing data from a Database within a Test Automation Framework will be mostly for validation of data already in the tables, where the actual inputs come from our Application Under Test(AUT). In Java Database Connectivity(JDBC) API the java.sql.ResultSet interface provides methods for retrieving the results of executed queries.
Usually in a Test Automation Framework like Selenium Framework we separate the helper/util class for Database connection from the calling test methods residing in another class. The problem with ResultSet here is, it cannot be passed between classes as it maintains a connection to a database, and closing the connection will erase the ResultSet. And best practices say that we should always close the connection and ResultSet after the results are retrieved.
Below are few examples using ResultSet and the CachedRowSet - the "disconnected" ResultSet. The CachedRowSet stores(caches) its data in memory so that it can operate on its own data without being connected to its data source.

1) Example using ResultSet: In the helper/util class here we return the ResultSet, but we cannot close the Connection.
................
 // JDBC driver name and database URL
 private final String JDBC_DRIVER = "oracle.jdbc.driver.OracleDriver";
 final String DB_URL = "jdbc:oracle:thin:@192.168.56.102:1521:ora10g";

 // Database credentials
 private final String USER = "oe";
 final String PASS = "oe";

 Connection conn = null;
 Statement stmt = null;

 public ResultSet getResult(String sql) {
  try {
   Class.forName(JDBC_DRIVER);
   conn = DriverManager.getConnection(DB_URL, USER, PASS);
   stmt = conn.createStatement();
   ResultSet rs = stmt.executeQuery(sql);
   // stmt.close(); //cant do this, if we want to return rs.
   // conn.close(); //ResultSet is closed with the statement or conn
   return rs;
  } catch (SQLException | ClassNotFoundException se) {
   se.printStackTrace();
   return null;
  }
 }
.................

Now from the calling test methods we can only close the ResultSet but not the Connection.
..............
sql = "SELECT EMPLOYEE_ID, FIRST_NAME, SALARY FROM Employees";
ResultSet rs = db.getResult(sql);
 try {
  while (rs.next()) {
  int id = rs.getInt("EMPLOYEE_ID");
  System.out.print("ID: " + id);
 }
//close only the resultset in finally, we cannot close connection from here
..............

2) Another Example with ResultSet: We can also implement only the Connection in the helper/util method, but in that case the closing of Connections, Resultset will have to be implemented by the person writing the test methods. But we want testers to only concentrate on writing tests, better :)
..........
 public Connection getDBConnection() { 
  try {
   Class.forName(JDBC_DRIVER);
   conn = DriverManager.getConnection(DB_URL, USER, PASS);
   return conn; // return connection only, caller has to close all db connections
  } catch (SQLException | ClassNotFoundException se) {
   se.printStackTrace();
   return null;
  }
 }
..........

And so from the test method:
......................
  sql = "SELECT EMPLOYEE_ID, LAST_NAME, JOB_ID FROM Employees";
  Connection conn = db.getDBConnection();
  Statement stmt = conn.createStatement();
  ResultSet rs = stmt.executeQuery(sql);
  try {
   while (rs.next()) {

    int id1 = rs.getInt("EMPLOYEE_ID");
    System.out.print("ID: " + id1);
   }
  }
 //Close Connection, ResultSet in finally block
......................

3) Example with CachedRowSet:
The best approach seems to be using the OracleCachedRowSet object which can operate in a disconnected environment. Populate a OracleCachedRowSet object with data from ResultSet and we can send it over the network, or to other classes  or serialize it.
Below is example of DB helper/util class returning OracleCachedRowSet and a test class using the CachedRowSet from the  DB util.
import java.sql.Connection;
import java.sql.DriverManager;
import java.sql.ResultSet;
import java.sql.SQLException;
import java.sql.Statement;
import oracle.jdbc.rowset.OracleCachedRowSet;
/**
 * Java Class: DButilCacheRowSet.java
 * Util class to fetch data from database and return the results to calling methods
 *  @author sarats
 *
 */
public class DButilCacheRowSet {
 private final String JDBC_DRIVER = "oracle.jdbc.driver.OracleDriver";
 private final String DB_URL = "jdbc:oracle:thin:@192.168.56.102:1521:ora10g";
 private final String USER = "oe";
 private final String PWD = "oe";
 private OracleCachedRowSet crs;

 private void executeQuery(String sql) throws ClassNotFoundException, SQLException {
  Class.forName(JDBC_DRIVER);
  Connection conn = DriverManager.getConnection(DB_URL, USER, PWD);
  Statement stmt = conn.createStatement();
  ResultSet rs = stmt.executeQuery(sql);
  crs = new OracleCachedRowSet();
  crs.populate(rs);
  rs.close();
  stmt.close();
  conn.close(); //close datasource connection
 }

 public OracleCachedRowSet getCachedResultSet(String sql) {
  try {
   executeQuery(sql);
   return crs;
  } catch (ClassNotFoundException | SQLException e) {
   e.printStackTrace();
   return null;
  }
 }
}

Now we test the helper method with the below class:
import java.sql.SQLException;
import oracle.jdbc.rowset.OracleCachedRowSet;
/**
 * Java class to test the CachedRowSet returned from DButilCacheRowSet.java 
 * @author sarats
 *
 */
public class TestDButilCRS {
 public static void main(String[] args) {
  OracleCachedRowSet crs;
  DButilCacheRowSet dbutil = new DButilCacheRowSet();
  String sql;
  sql = "SELECT EMPLOYEE_ID, FIRST_NAME, SALARY FROM Employees";
  crs = dbutil.getCachedResultSet(sql);
  try {
   while (crs.next()) {
    // Retrieving the results and displaying it
    int id = crs.getInt("EMPLOYEE_ID");
    String first = crs.getString("FIRST_NAME");
    String sal = crs.getString("SALARY");

    System.out.print("ID: " + id);
    System.out.print("; Firstname: " + first);
    System.out.println("; Salary: " + sal);
   }
  } catch (SQLException se) {
   se.printStackTrace();
  } finally {
   try {
    crs.close();
   } catch (SQLException e) {
    e.printStackTrace();
   }
  }
 }
}

Finally there are ofcourse other ways of doing this like spring-jdbc template, ApacheDButils, or creating a container for holding the ResultSet. We leave that for some other day :)

References:
http://docs.oracle.com/javase/tutorial/jdbc/basics/cachedrowset.html
http://www.onjava.com/pub/a/onjava/2004/06/23/cachedrowset.html
Read More »

Creating Threads in Java

Threads help a single program to have multiple execution paths or multiple flow of control. Each flow of control can be thought of as a separate program known as thread, that runs concurrently with other such threads.
Creating threads in Java is implementing the run() method, which is the heart and soul of any thread. The run() method will have our entire business logic of the thread. The run() method is initiated with the help of another method called start().
There are two ways of creating a thread in Java:
- Implementing the Runnable interface.
- Extending the Thread class.
Note that if our class needs to extend another class, we have to create a thread by Implementing the Runnable Interface, since a Java class cannot have two superclass.

In this post we will see how to create a Thread by Implementing the Runnable Interface.
Follow the Steps below to create threads using the Runnable Interface:
1. Create a class implementing the Runnable Interface.
2. Implement the run() method in the class. This method will contain the business logic of the thread.
3. Create an Object of the  java.lang.Thread class by passing a Runnable object(of class created in Step 1) as argument to the Thread constructor.
4. Invoke the thread's start() method on the Thread object created in the Step 3.

Example program: RunnableTest1.java
class Test1 implements Runnable { //step1
 private String threadName;
 
 Test1(String thrdName) {
  threadName  = thrdName;
 }
 
 public void run() {    //Step2
          for(int i = 1; i <= 5; i++) {
             System.out.println("Thread Counter " + threadName + ": " + i);
//  Un-comment below line if you want to get info about the current thread
//             System.out.println(Thread.currentThread());
           }
  System.out.println("Thread " + threadName  + " ends...");
 }
}

public class RunnableTest1 {
 public static void main(String[] args) {
  Test1 runnable = new Test1("Testing-A");
  Thread thrd = new Thread(runnable);  //Step3
  thrd.start();       //Step4
  
  new Thread(new Test1("Testing-Z")).start(); //Start another thread, Step3 and Step4 combined
  System.out.println("Main program-thread ends...");
 }
}

RunnableTest1 Output:
Thread Counter Testing-A: 1
Thread Counter Testing-A: 2
Thread Counter Testing-A: 3
Main program-thread ends...
Thread Counter Testing-A: 4
Thread Counter Testing-A: 5
Thread Testing-A ends...
Thread Counter Testing-Z: 1
Thread Counter Testing-Z: 2
Thread Counter Testing-Z: 3
Thread Counter Testing-Z: 4
Thread Counter Testing-Z: 5
Thread Testing-Z ends...

Example program: RunnableTest2.java
class Test2 implements Runnable { // Step1
 private Thread thrd;

 Test2() { // no args constructor
 }

 public Test2(String thrdName) {
  thrd = new Thread(this, thrdName); // Step3
  System.out.println("Starting thread " + thrd.getName());
  thrd.start(); // Step4
 }

 public void run() { // Step2
  for (int i = 1; i <= 5; i++) {
   System.out.println("Thread Counter: "
     + Thread.currentThread().getName() + " - " + i);
  }
  System.out.println("Thread " + Thread.currentThread().getName() + " ends...");
 }
}

public class RunnableTest2 {
 public static void main(String[] args) {
  Test2 testThread1 = new Test2("Testing-A");

  // Same as previous program(RunnableTest1), but this will call the
  // no-args constructor
  Thread testThread2 = new Thread(new Test2(), "Testing-Z"); // Step3
  testThread2.start(); // Step4
  System.out.println("Main program-thread ends...");
 }
}
RunnableTest2 Output:
Starting thread Testing-A
Main program-thread ends...
Thread Counter: Testing-A - 1
Thread Counter: Testing-Z - 1
Thread Counter: Testing-Z - 2
Thread Counter: Testing-Z - 3
Thread Counter: Testing-Z - 4
Thread Counter: Testing-Z - 5
Thread Testing-Z ends...
Thread Counter: Testing-A - 2
Thread Counter: Testing-A - 3
Thread Counter: Testing-A - 4
Thread Counter: Testing-A - 5
Thread Testing-A ends...


Read More »

Selenium NoClassDefFoundError:com/google/common/base/Function

Selenium Issue: java.lang.NoClassDefFoundError: com/google/common/base/Function

java.lang.NoClassDefFoundError: com/google/common/base/Function
at com.gui.test.MyTest.setup(MyTest.java:25)
at sun.reflect.NativeMethodAccessorImpl.invoke0(Native Method)
at sun.reflect.NativeMethodAccessorImpl.invoke(Unknown Source)
at sun.reflect.DelegatingMethodAccessorImpl.invoke(Unknown Source)
at java.lang.reflect.Method.invoke(Unknown Source)
....................
....................
Caused by: java.lang.ClassNotFoundException: com.google.common.base.Function
at java.net.URLClassLoader$1.run(Unknown Source)
at java.security.AccessController.doPrivileged(Native Method)
at java.net.URLClassLoader.findClass(Unknown Source)
at java.lang.ClassLoader.loadClass(Unknown Source)
at sun.misc.Launcher$AppClassLoader.loadClass(Unknown Source)
at java.lang.ClassLoader.loadClass(Unknown Source)
... 25 more

Solution:

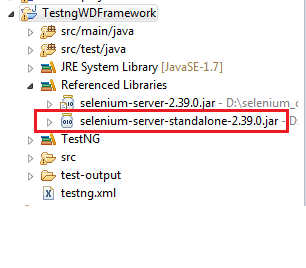
Add the selenium-server-standalone-x.xx.jar to your classpath.


Read More »

Java DTO Pattern Design Example

DTO or Data Transfer Object also known as Value Object(VO) is a simple Java object or POJO(Plain Old Java Object) used during transferring data between different layers/tiers in the application. It does not have any behaviour of its own, except for storage and retrieval. In multi-tiered application the calls between different layers are usually expensive, DTO helps in reducing the number of method calls made. For e.g. if we want to insert several related columns into database tables, instead of making several calls we can pass/transfer on the object consisting of all data and accomplish with a single call.
A better definition you can read from here.
DTO is designed with all appropriate attributes and getter, setter methods. It is often Serializable, so that it could be transferred over the network.
Sample DTO class design:

import java.io.Serializable;
import java.util.Date;

public class EmployeeDTO implements Serializable {

 private int id;
 private String name;
 private Date birthDate;

 public EmployeeDTO() {
 }

 public EmployeeDTO(int id, String name, Date birthDate) {
  this.id = id;
  this.name = name;
  this.birthDate = birthDate;
 }

 public void setId(int id) {
  this.id = id;
 }

 public void setName(String name) {
  this.name = name;
 }

 public void setBirthDate(Date birthDate) {
  this.birthDate = birthDate;
 }

 public int getId() {
  return id;
 }

 public String getName() {
  return name;
 }

 public Date getBirthDate() {
  return birthDate;
 }

}

Read More »

Method Overriding and Overloading in Java

"Strive to be of Value, Not to be a Success"
--Albert Einstein
Method Overriding is when a subclass redefines/rewrites an inherited method. Same method name and arguments are available in parent(base) and child(sub) class, but their implementation will differ. Calling the method with a sub-class variable will execute the sub-class's method. Sample program below to demonstrate overriding.

Method Overloading is when we have two or more methods in a class with same name but different arguments. In the program below I added overloaded methods in base and sub-class.

 package com.examples;  
 import java.util.Date;  
 class India {  
      void ride() {  
           System.out.println("Riding in India..");  
      }  
      void load() {  
           System.out.println("Loading in India");  
      }  
 }  
 class Bangalore extends India {  
      @Override //Good practice  
      void ride() {//Overriding method  
           System.out.println("Riding in Bangalore...");  
      }  
      void load(Date n) { //Overloading here  
           System.out.println("Loading in Bangalore: " + n);  
      }  
 }  
 public class OverrideOverload {  
      public static void main(String[] args) {  
           // TODO Auto-generated method stub  
           Bangalore ob = new Bangalore();  
           ob.ride();  
           ob.load();  
           ob.load(new Date());  
      }  
 }  

Output:
 Riding in Bangalore...  
 Loading in India  
 Loading in Bangalore: Thu Feb 27 01:24:58 IST 2014  

Note: Annotating an overriding method with @Override is a good practice. This properly indicates the compiler about overriding and helps detect overloading or other mistakes, for e.g. if somebody else is reviewing the code.
Read More »

Program throws "java.lang.OutOfMemoryError" in Eclipse

In Eclipse, if the program doesnot get the required memory it throws "java.lang.OutOfMemoryError: Java heap space". For e.g. in my threaded program it throws:
Exception in thread "Thread-29" java.lang.OutOfMemoryError: Java heap space
 at java.util.HashMap.(Unknown Source)
 at weblogic.xml.util.LLNamespaceMap.(LLNamespaceMap.java:16)
................
................
Exception in thread "Thread-33" java.lang.OutOfMemoryError: Java heap space
Exception in thread "Thread-26" java.lang.OutOfMemoryError: Java heap space
Exception in thread "Thread-13" java.lang.OutOfMemoryError: Java heap space

We can fix this in Eclipse VM arguments.
On Eclipse menu, go to Run -> Run Configurations...
In the corresponding "Run Configurations" window select the Java Application that you intend to modify(this might be default selected if you have just ran the program).
Then click on the "Arguments" tab, and edit/add the "VM arguments" with "-Xms512M -Xmx1024M".
This will increase the VM heap size to minimum 512MB and a max of 1GB. Click "Apply" and "Run".


Read More »