Key Elements of Robot Framework


1. Test Data Syntax:
Robot Framework uses simple and easy-to-understand tabular syntax for test data representation. Test cases, test suites, and keywords are organized in tables, making them highly readable for any test designer.

*** Test Cases ***
Verify Login Functionality
    [Documentation]   Test to verify the login functionality
    [Tags]   Smoke
    Open Browser   ${URL}   ${Browser}
    Input Text   ${UsernameField}   ${Username}
    Input Text   ${PasswordField}   ${Password}
    Click Button   ${LoginButton}
    Page Should Contain Element   ${WelcomeMessage}
    Close Browser


2. Built-in Keywords & Libraries:
Robot Framework provides a rich set of built-in keywords that covers various aspects of test automation, including browser interaction, file operations, database connections, and more. These keywords can be readily used to build test cases.
Also, Robot Framework supports a wide range of test libraries, enabling users to perform various types of testing such as web testing, API testing, database testing, and more. These libraries provide additional keywords and functionality specific to different testing domains.
Example of Keywords:
*** Test Cases ***
Verify Search Functionality
    [Documentation]   Test to verify the search functionality
    [Tags]   Regression
    Open Browser   ${URL}   ${Browser}
    Input Text   ${SearchField}   ${SearchKeyword}
    Press Key   ${SearchField}   ENTER
    Wait Until Page Contains   ${SearchResult}
    Close Browser

Example of  Test Libraries With Selenium and for REST API:

*** Settings ***
Library   SeleniumLibrary
Library   RESTInstance   ${APIEndpoint}

*** Test Cases ***
Verify API Functionality
    [Documentation]   Test to verify the API functionality
    Create Session   MySession   ${APIEndpoint}   headers=${APIHeaders}
    ${response}   Post Request   MySession   /users   data=${Payload}
    Should Be Equal   ${response.status_code}   201
    Close All Sessions


3. Extensibility:
Robot Framework is highly extensible, allowing users to define their own keywords and libraries using Python or other programming languages. This makes it flexible and adaptable to different testing needs and environments.
*** Settings ***
Library   SeleniumLibrary
Library   DatabaseLibrary

*** Test Cases ***
Verify Database Connection
    [Documentation]   Test to verify the database connection
    Connect To Database   ${DBUrl}   ${DBUsername}   ${DBPassword}
    ${queryResult}   Query   SELECT * FROM Users
    Log Many   ${queryResult}
    Disconnect From Database


4. Test Data-driven Approach:
 Robot Framework promotes a data-driven approach to testing, where test data is separated from test logic. This allows for efficient test maintenance and reusability, as test data can be easily modified or extended without changing the underlying test cases.
*** Settings ***
Resource   TestData.robot

*** Test Cases ***
Verify Login Credentials
    [Documentation]   Test to verify different login credentials
    [Template]   Verify Login
    ${username}   ${password}   ${expectedMessage}


5. Test Execution and Reporting:
Robot Framework offers comprehensive test execution capabilities, allowing tests to be run in various modes, including sequential, parallel, and distributed execution. It generates detailed test reports and logs, making it easy to analyze test results and identify issues.

$ robot --outputdir results tests


6. Cross-platform Support & Easy Integration:
Robot Framework is platform-independent and can be used for testing applications across different operating systems, including Windows, macOS, and Linux. It can be easily integrated with other tools and frameworks, such as Jenkins for continuous integration, Selenium for web testing, and RESTAssured for API testing. It also has a large and active community that contributes libraries, plugins, and resources to enhance its functionality.


Finally, Robot is a powerful tool and test automation framework with nice features that make it stand out. 
  1. Its simple and readable syntax allows for easy test case creation and maintenance.
  2. The modular and extensible architecture enables integration with various libraries and tools, expanding its capabilities.
  3. The built-in test reporting and logging features provide detailed insights into test execution.
  4. The support for data-driven and keyword-driven testing promotes reusability and maintainability.
Using this framework test automation developers or testers can efficiently design and execute automated tests, accelerating the software testing process and improving the quality of software products.
You can embrace Robot Framework and unlock the potential of automated testing in your projects!
Read More »

Using Docker in Jenkins Pipeline Job | Jenkins Docker Plugin

Using Docker with Jenkins offers several advantages within our continuous integration and deployment(CI/CD) pipelines. Well, docker allows for containerization, so our applications and their dependencies can be bundled together in a lightweight, and isolated environment.


Here are a few points on why we should use Dockers with Jenkins Pipeline Jobs:

Easy Environment Setup: Docker provides a consistent and stable environment for doing our build, test, and deployment processes. With Docker, we can package our application and its dependencies into a container, ensuring that it runs consistently across different environments wheater QA or Dev, or Production.

Scalability: Docker will enable easy scaling of our Jenkins infrastructure. We can create and manage multiple Jenkins docker containers as agents to distribute the workloads and handle increased job demands efficiently.

Isolation and Resource Efficiency: Each Jenkins job can be executed in its own Docker container, providing isolation from other jobs in our Jenkins server. This isolation ensures that any changes or dependencies required by a specific job won't impact others. Additionally, Docker allows you to make optimal use of system resources by allocating them precisely to each container.

Faster Build and Test Cycles: Docker's are lightweight in nature and as such will have fast startup time, this contributes to faster build and test cycles. With Docker, you can easily spin up multiple containers, run tests, and tear them down quickly, leading to improved overall development speed and productivity.

Reproducible Builds: Docker enables reproducible builds by encapsulating the application code, dependencies, and environment configuration within a container. This ensures that the build process remains consistent, regardless of the underlying infrastructure.

Simplified Deployment: Docker containers can be easily deployed to various environments, including QA or development, staging, and production. This simplifies the deployment process and helps ensure that the application runs consistently across different environments, regardless of the underlying infrastructure.

In this following video let's see how to use docker with Jenkins Pipeline Jobs. Note that you will need to install docker in the host where you will be running the job.


Thank you! Cheers!


Read More »

How to Install Git on Windows


GIT is a file version control system which is very popular now. It is really fast and simple, fully distributed, highly parallel, and scalable enough to handle the smallest to the largest software projects in the world.

Download the installation package from below link: https://gitforwindows.org/ 

The default options are pretty ok for most users and of-course you can customize it after installing also. 

Follow the video to learn about the installation process.


Thank You and Happy Learning Git!

Take the complete Git course at Udemy using the link here
Read More »

Python Unittest Tutorial Using the Unittest framework

Unit testing or whitebox testing, is a good way to enforce quality checks early on during product development phase. Unit test will test a small component of the application, for e.g. a method, or a smallest testable part of any software. Its different from integration tests where the integrated product is tested.
In this video session let us learn about Unit testing in Python3.

We will be using "unittest" framework, which comes as default Python standard library installation and dont need extra install. 

We will be using python 3.6 version and Pycharm as the IDE for our tutorials. We will be getting started with the following topics:
  • Test pkgs organize
  • Unittest rules:
    •  Import unittest, subclassing unittest.TestCase.
    •  Naming the tests.
    •  Using assert from TestCase class
    •  Run the Testcases using unittest runner
    • Write tests for a "simple calculator" app
  • How to Run test from Pycharm IDE - Reports in Pycharm "run" console
  • Show passed, Show ignored, and Export to html.


Ref Links: https://docs.python.org/3/library/unittest.html

The full Python Unit Testing videos here in Youtube.

Python Testing course in Udemy link here.
Read More »

How To Install Groovy in Eclipse & How to run a Groovy Script

Groovy has been gaining lot of popularity since some time coz of its static and dynamic nature of execution. It is based on Java or JVM, and so its a statically typed language.

Also it is a dynamic language with features similar to those of Python, Ruby.

Eclipse is one of the most popular opensource IDE used for Java/J2EE project development. It can be used for development of other languages as well, like PHP, Python, etc.

In the following video let us see how to install Groovy in Eclipse(v4.7), and how to run groovy scripts and groovy classes in eclipse.


Read More »

How To Run Python 2 and Python 3 in same Windows and Also from git-bash


Most times we want to work on different version of Python in our Windows system. In the following video learn how to run both Python 2.7.x and Python 3.x in the same Windows 10 system.

Also learn how to easily run python from git-bash prompt.


For running python easily in git bash:
Add the following in file .bashrc(create if not available). alias python3='winpty /c/(Python 3.x folder path)/python.exe' alias python='winpty /c/(Python 2.x folder path)/python.exe' The .bashrc file will be in home folder in git bash.
Note: Type cd ~ , to go to your home folder. e.g. $ cd ~

Happy Learning!!


Python Testing course in Udemy link here.
Read More »

Free Public Rest API's for API Testing & Learning API Automation

Here are a Couple of Free sample Rest API URL that anyone can use for Testing, learning API Automation and Prototyping.
No Registration or Authentication is required for these API's. Go Ahead and try out the API's using any API client like SoapUI or Postman.
In the video below, I have used soapUI to explore the API's and how to do different types of API requests.
Happy Learning!!


Read More »

How To Set RestAPI Headers in SoapUI - Manually and Dynamically


Headers are an important part of RestAPI Request and Response. In this video let us learn how to set the headers in 3 different ways.
 - Set Custom Headers manually.
 - Set Headers from custom Properties in Project or Testsuite or Testcase level.
 - Set Headers dynamically from API response using Property Transfer Step.

In the following video, you will see How to Add Headers in SoapUI Opensource, both static and dynamically reading from Response.


The API used is freely available at https://gorest.co.in/, you need to register to get the API token.
Read More »

How To Do Contains Assertion in SoapUI


SoapUI Assertions are used to validate the API response received by a TestStep API during Testcase execution. "Contains Assertion" searches for a string in the API response and based on the availability of the string marks pass/fail for the Testcase. We have options of "Ignore Case" and "Regular Expression" on the search string.
In the following video, you will see about "Contains Assertion" in SoapUI Opensource. Also "Not Contains Assertion" is similar and can be used within a Testcase.


Read More »

Free Sample Rest API Server for Testing and Prototyping

Python-Flask-JWT based Rest API server, can be used to API Automation learning, prototyping.

Recently I was looking to try out an API automation tool for demo, and as I wanted to show test-case validation as well which required connecting to the backend DB, I wasn't able to find a proper public one with all my criteria's.
Finally wrote a small Rest API server and pushed it to github, so anyone can use it and learn. It is very easy to setup and use with little skills in python and virtual env.

You can clone or download it from github:
https://github.com/saratkr/Py-Flask-API-Server

Please refer the readme.md for setting up the server in your windows machine. It has not been tested in Linux server, but can be made working with minimal changes.

Start the server from cmd line in windows:


Login: Once its running in your PC, you can get a JWT token with the login API endpoint:
http://127.0.0.1:5000/api/v1/users/login.
The default username/password is admin/admin.
See screenshot from Postman:


The Login response will give a Authorization token which will be used in the header of all other API requests.
Sample Request: Please see a sample getusers request:


Following API endpoints are supported:
  • Create new User: POST /api/v1/users/create
  • Get all users: GET /api/v1/users/getusers
  • Get one user with ID: GET /api/v1/users/1
  • Delete one user with ID: DELETE /api/v1/users/delete/2
  • Delete one user with email: DELETE /api/v1/users/delete
  • Update one user: UPDATE /api/v1/users/update
So please go ahead prototype your application, or try/learn Rest API Testing or even learn how to write API automation scripts using soapUI or Postman.

Learn complete SoapUI Testing with No Coding at Udemy using the link here.
Read More »

Jenkins - How To Add a Agent node or Slave Node

1. Check the slave node and necessary packages(java) are installed:
 [root@nx-psowifi ~]# cat /etc/redhat-release  
 CentOS Linux release 7.4.1708 (Core)

 [root@nx-psowifi ~]# java -version  
 openjdk version "1.8.0_151"  
 OpenJDK Runtime Environment (build 1.8.0_151-b12)  
 OpenJDK 64-Bit Server VM (build 25.151-b12, mixed mode)  
If Java-8 is not installed, you may install it with the command: yum -y install java-1.8.0-openjdk

2. Create a user(jenkins) on the slave node:
 [root@nx-psowifi ~]# useradd -d /var/lib/jenkins jenkins  
 [root@nx-psowifi ~]# id jenkins  
 uid=454(jenkins) gid=100(users) groups=100(users)  
This user and the folder path will be used in Jenkins side configuration below.

3. Generate ssh key for server to login:
In the slave node go to some folder, maybe /tmp, and type ssh-keygen. Follow the prompts, and do note down the passphrase entered.
 [root@nx-psowifi tmp]# ssh-keygen  
 Generating public/private rsa key pair.  
 Enter file in which to save the key (/root/.ssh/id_rsa):  
 Enter passphrase (empty for no passphrase):  
 Enter same passphrase again:  
 Your identification has been saved in /root/.ssh/id_rsa.  
 Your public key has been saved in /root/.ssh/id_rsa.pub.  
 The key fingerprint is:  
 SHA256:wZ/hs075xboarhPAJyFsiXz9PdMAw4CDCbphgguRSkk root@nx-psowifi  
 The key's randomart image is:  
 +---[RSA 2048]----+  
 |+E.= +.oo.    |  
 |++= O o....   |  
 |O. o + oo..o   |  
 |=+  + o++o.  |  
 |o   +S =o   |  
 |    . + .  |  
 |     .=  o |  
 |    .+ o o  |  
 |    .o+.+.  |  
 +----[SHA256]-----+  
The above will generate 2 key files in .ssh folder in the location(specified above).
[general@nx-psowifi ~]$ ls /root/.ssh/
id_rsa  id_rsa.pub

The "id_rsa.pub" is the public key.
The "id_rsa" private key will be used in Jenkins UI while configuring the slave node.

4. Copy public key to the authorized_keys file of jenkins user, and change owner of the file:
 [root@nx-psowifi ~]# mkdir /var/lib/jenkins/.ssh  
 [root@nx-psowifi ~]# cp /root/.ssh/id_rsa.pub /var/lib/jenkins/.ssh/authorized_keys  
 [root@nx-psowifi ~]# cd /var/lib/jenkins/.ssh/; chown jenkins:users authorized_keys  

5. Configure Jenkins to add the slave node:
Log in to Jenkins UI, go to Manage Jenkins, then Manage Nodes, then click New Node, give your node a name, then select Permanent Agent and click OK.
Fill up or select all the appropriate values as in the screenshot below, and wait before clicking save.

For Credentials, select the button Add -> Jenkins, and you'll get a screen as below:

Enter as below:
Username = jenkins
Private Key = select "Enter directly". Copy the contents of private key "id_rsa" from step3 above, into the Key field.
Passphrase = Enter the passpharse, noted down during step3.
You may enter or leave blank a descriptive id and description, then click Add.
You may now save the New Node creation.

6. Check the new slave node is working fine:
Go to Jenkins UI, go to Manage Jenkins, then Manage Nodes, then click our just created node name, then in the subsequent page click "Launch agent" button.
If all configuration are fine, you should see output in the same page something like below:
 ...........  
 ...........  
 [12/20/18 00:05:05] [SSH] Checking java version of java  
 [12/20/18 00:05:05] [SSH] java -version returned 1.8.0_151.  
 [12/20/18 00:05:05] [SSH] Starting sftp client.  
 [12/20/18 00:05:05] [SSH] Copying latest slave.jar...  
 [12/20/18 00:05:06] [SSH] Copied 745,674 bytes.  
 Expanded the channel window size to 4MB  
 [12/20/18 00:05:06] [SSH] Starting slave process: cd "/var/lib/jenkins" && exec java -jar slave.jar  
 <===[JENKINS REMOTING CAPACITY]===>channel started  
 Remoting version: 3.14  
 This is a Unix agent  
 Evacuated stdout  
 Agent successfully connected and online  
 ...  
Read More »

How To Create a Jar for Selenium TestNg tests using Maven

Recently there was a request from the deployment team to run some GUI and API test in the production environment, and the deployment team wanted to make it as simple as possible. Since it was supposed to be deployed in multiple customer locations, and they don't want to configure the remote connections and accessibility for multiple locations across the globe. Their proposal was to give them some automated standalone tool and they run the selenium or API test and report us the test results.

In this post we'll see how to generate a jar and run TestNg tests from command line, using Maven.

1. Maven Plugin
The Maven plugin which we are interested is maven-assembly-plugin, with descriptorRef as jar-with-dependencies.
The entire pom.xml as below.
 <project xmlns="http://maven.apache.org/POM/4.0.0" xmlns:xsi="http://www.w3.org/2001/XMLSchema-instance"  
      xsi:schemaLocation="http://maven.apache.org/POM/4.0.0 http://maven.apache.org/xsd/maven-4.0.0.xsd">  
      <modelVersion>4.0.0</modelVersion>  
      <groupId>AutoTestFramework</groupId>  
      <artifactId>AutoTestFramework</artifactId>  
      <version>0.0.1-SNAPSHOT</version>  
      <dependencies>  
           <dependency>  
                <groupId>org.seleniumhq.selenium</groupId>  
                <artifactId>selenium-java</artifactId>  
                <version>3.0.1</version>  
           </dependency>  
           <dependency>  
                <groupId>org.testng</groupId>  
                <artifactId>testng</artifactId>  
                <version>6.10</version>  
                <scope>compile</scope>  
           </dependency>  
           <dependency>  
                <groupId>junit</groupId>  
                <artifactId>junit</artifactId>  
                <version>4.12</version>  
           </dependency>  
           <dependency>  
                <groupId>io.github.bonigarcia</groupId>  
                <artifactId>webdrivermanager</artifactId>  
                <version>1.5.0</version>  
           </dependency>  
           <dependency>  
                <groupId>com.sun.jersey</groupId>  
                <artifactId>jersey-client</artifactId>  
                <version>1.19.3</version>  
           </dependency>  
           <dependency>  
                <groupId>log4j</groupId>  
                <artifactId>log4j</artifactId>  
                <version>1.2.17</version>  
           </dependency>  
           <dependency>  
                <groupId>org.json</groupId>  
                <artifactId>json</artifactId>  
                <version>20160810</version>  
           </dependency>            
      </dependencies>  
      <build>  
           <pluginManagement>  
                <plugins>  
                     <plugin>  
                          <artifactId>maven-compiler-plugin</artifactId>  
                          <version>3.1</version>  
                          <configuration>  
                               <source>1.8</source>  
                               <target>1.8</target>  
                          </configuration>  
                     </plugin>  
                     <plugin>  
                          <artifactId>maven-assembly-plugin</artifactId>  
                          <version>3.0.0</version>  
                          <configuration>  
                               <descriptorRefs>  
                                    <descriptorRef>jar-with-dependencies</descriptorRef>  
                               </descriptorRefs>  
                          </configuration>  
                          <executions>  
                               <execution>  
                                    <id>make-assembly</id>  
                                    <phase>package</phase>  
                                    <goals>  
                                         <goal>single</goal>  
                                    </goals>  
                               </execution>  
                          </executions>  
                     </plugin>  
                     <plugin>  
                          <groupId>org.apache.maven.plugins</groupId>  
                          <artifactId>maven-surefire-plugin</artifactId>  
                          <version>2.16</version>  
                          <configuration>  
                               <suiteXmlFiles>  
                                    <!-- suiteXmlFile>testng.xml</suiteXmlFile-->  
                                    <!-- suiteXmlFile>suitestestng.xml</suiteXmlFile -->  
                               </suiteXmlFiles>  
                               <includes>  
                                    <include>**/Test*.java</include>  
                                    <include>**/*Tests.java</include>  
                                    <include>**/*Test.java</include>  
                                    <include>**/*TestCase.java</include>  
                               </includes>  
                          </configuration>  
                     </plugin>  
                </plugins>  
           </pluginManagement>  
           <plugins> <!-- jar with dependencies will NOT be generated without this, for #mvn package or install -->  
       <plugin>  
         <groupId>org.apache.maven.plugins</groupId>  
         <artifactId>maven-assembly-plugin</artifactId>  
       </plugin>  
     </plugins>  
      </build>  
 </project>  

2. The project structure:
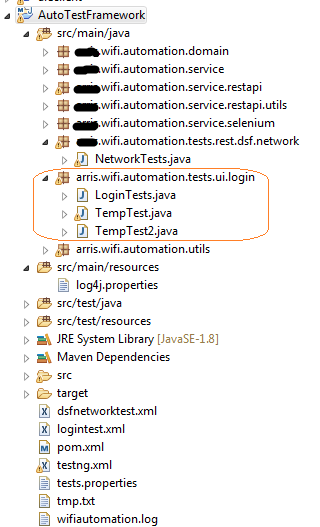
The screen-shot of my automation project as below.
Note that my test classes are in src/main/java folder, and not in src/test/java folder.

3. Generating the jar:
Right click the project in eclipse and do Maven Install or Package goal. You should see 2 jars created - one without dependencies and another with dependencies, under target folder.


4. Running the test classes:
Take the jar with dependencies to a separate location or system, and run as below.
 #java -cp AutoTestFramework-0.0.1-SNAPSHOT-jar-with-dependencies.jar org.testng.TestNG testng.xml  

The testng.xml should be in the same folder, and the running system should have same jdk version installed with which the jar was built.

Read More »

Generating SOAP webservice client stubs using Apache-CXF, Maven, Eclipse

How to create WSDL-first Java SOAP webservice client using CXF, Maven, and Eclipse.

Recently we wanted to build a Soap webservice client to invoke some operations in the production server. The client is supposed to be used by support staff and they have some determined set of operations to be performed on a daily basis. It turned out giving them a jar with command line options required for their operations.
In this post let me try to show how to generate the client stubs and invoke an operation. We will use CXF tool called wsdl2java to turn the WSDL into Java client code and Maven for dependencies and generating the code. We will use Eclipse as the IDE.

1. SOAP Service WSDL for our example:
For this example let us get the CDyne free GetStockQuote WSDL from here. You can right-click the link and save the WSDL to a location in your system.

2. Eclipse Maven Project and POM file:

  • Create a new Maven project in eclipse with artifactId as stockquote. See pom below for the options.
  • Place the downloaded WSDL at location stockquote/src/main/resources/
  • Add the maven dependencies and the required plugins as below.

 <project xmlns="http://maven.apache.org/POM/4.0.0" xmlns:xsi="http://www.w3.org/2001/XMLSchema-instance"  
      xsi:schemaLocation="http://maven.apache.org/POM/4.0.0 http://maven.apache.org/xsd/maven-4.0.0.xsd">  
      <modelVersion>4.0.0</modelVersion>  
      <groupId>com.sqadev</groupId>  
      <artifactId>stockquote</artifactId>  
      <version>0.0.1-SNAPSHOT</version>  
      <name>Stock Quote client</name>  
      <properties>  
           <cxf.version>3.1.7</cxf.version>  
           <java.version>1.8</java.version>  
      </properties>  
      <dependencies>  
           <dependency>  
                <groupId>org.apache.cxf</groupId>  
                <artifactId>cxf-rt-frontend-jaxws</artifactId>  
                <version>${cxf.version}</version>  
           </dependency>  
           <dependency>  
                <groupId>org.apache.cxf</groupId>  
                <artifactId>cxf-rt-transports-http</artifactId>  
                <version>${cxf.version}</version>  
           </dependency>  
      </dependencies>  
           <build>  
           <plugins>  
           <!--Generate Java stub from WSDL at build time -->  
                <plugin>  
                     <groupId>org.apache.cxf</groupId>  
                     <artifactId>cxf-codegen-plugin</artifactId>  
                     <version>${cxf.version}</version>  
                     <executions>  
                          <execution>  
                               <id>generate-sources</id>  
                               <phase>generate-sources</phase>  
                               <configuration>  
                                    <sourceRoot>${basedir}/generated/cxf/src/main/java</sourceRoot>  
                                    <wsdlOptions>  
                                         <wsdlOption>  
                                              <wsdl>${basedir}/src/main/resources/delayedstockquote.wsdl</wsdl>  
                                              <extraargs>  
                                                   <extraarg>-client</extraarg>  
                                                   <extraarg>-impl</extraarg>  
                                                   <extraarg>-verbose</extraarg>  
                                              </extraargs>  
                                         </wsdlOption>  
                                    </wsdlOptions>  
                               </configuration>  
                               <goals>  
                                    <goal>wsdl2java</goal>  
                               </goals>  
                          </execution>  
                     </executions>  
                </plugin>  
                <!-- Add the generated sources, this avoids having to copy generated sources to build location -->  
       <plugin>  
         <groupId>org.codehaus.mojo</groupId>  
         <artifactId>build-helper-maven-plugin</artifactId>  
         <version>1.12</version>  
         <executions>  
           <execution>  
             <id>add-source</id>  
             <phase>generate-sources</phase>  
             <goals>  
               <goal>add-source</goal>  
             </goals>  
             <configuration>  
               <sources>  
                 <source>${basedir}/generated/cxf/src/main/java</source>  
               </sources>  
             </configuration>  
           </execution>  
         </executions>  
       </plugin>  
           </plugins>  
           </build>  
 </project>  

  • If you get undefined element declaration exception, please refer here to fix it.
  • We use cxf-codegen-plugin to run wsdl2java to generate our Java code into ${basedir}/generated/cxf/src/main/java
  • In eclipse java code is generated using Maven generate-sources. Right click the project stockquote -> Run as -> Maven generate-sources.
  • On successful build the source files will be generated in the new folder /generated/cxf/src/main/java.
  • Four client are generated as DelayedStockQuoteHttpGet_DelayedStockQuoteHttpGet_Client, ...HttpPost_Client and ...Soap_Client, ...Soap12_Client version. See eclipse screenshot below:


3. Running the Client:
Now that we have the client code generate, let us try to check if it's working.
Update one of the client code to check if the request/response works fine.
Sample code after updating DelayedStockQuoteSoap_DelayedStockQuoteSoap_Client:

................
 DelayedStockQuote ss = new DelayedStockQuote(wsdlURL, SERVICE_NAME);  
     DelayedStockQuoteSoap port = ss.getDelayedStockQuoteSoap();   
     {  
     System.out.println("Invoking getQuote...");  
     java.lang.String _getQuote_stockSymbol = "VZ";  
     java.lang.String _getQuote_licenseKey = "0";  
     com.cdyne.ws.QuoteData _getQuote__return = port.getQuote(_getQuote_stockSymbol, _getQuote_licenseKey);  
     System.out.println("getQuote.result = " + _getQuote__return.getCompanyName());  
     System.out.println("getQuote.result.Verizon.lastTradeAmt = " + _getQuote__return.lastTradeAmount);  
     }  
     {  
     System.out.println("Invoking getQuoteDataSet...");  
     java.lang.String _getQuoteDataSet_stockSymbols = "";  
     java.lang.String _getQuoteDataSet_licenseKey = "";  
     com.cdyne.ws.GetQuoteDataSetResponse.GetQuoteDataSetResult _getQuoteDataSet__return = port.getQuoteDataSet(_getQuoteDataSet_stockSymbols, _getQuoteDataSet_licenseKey);  
     System.out.println("getQuoteDataSet.result=" + _getQuoteDataSet__return);  
     }  
................

In eclipse right click on the file and select "Run As" --> "Java Application".
Sample result as below:
 Nov 12, 2016 11:52:45 PM org.apache.cxf.wsdl.service.factory.ReflectionServiceFactoryBean buildServiceFromWSDL  
 INFO: Creating Service {http://ws.cdyne.com/}DelayedStockQuote from WSDL: file:/C:/mysoftware/eclipse_wrkspce/stockquote/src/main/resources/delayedstockquote.wsdl  
 Invoking getQuote...  
 getQuote.result = Verizon Communications Inc. Com  
 getQuote.result.Verizon.lastTradeAmt = 46.69  
 Invoking getQuoteDataSet...  
 getQuoteDataSet.result=com.cdyne.ws.GetQuoteDataSetResponse$GetQuoteDataSetResult@9573584  
 Invoking getQuickQuote...  
 getQuickQuote.result=0  

Looks like our client is fetching results...
Src code in GitHub.
Next(in another post) we will see how we can build a jar with cmd line options to make some soap request/response.
Read More »

CXF wsdl2java - undefined element declaration 's:schema' - PluginExecutionException

Recently I got a third party generated wsdl, and when I try to use wsdl2java cxf-codegen-plugin in maven eclipse it shows the below error in the wsdl:

undefined element declaration 's:schema' (org.apache.cxf:cxf-codegen-plugin:3.1.7:wsdl2java:generate-sources:generate-sources)

After some googling it seems to be a common issue with JAXB and .NET WSDL.

Here is the problematic part of the WSDL:
 <s:element minOccurs="0" maxOccurs="1" name="GetQuoteDataSetResult">  
  <s:complexType>  
   <s:sequence>  
    <s:element ref="s:schema"/>  
    <s:any/>  
   </s:sequence>  
  </s:complexType>  
 </s:element>  

The easier solution seems to be to download the WSDL and modify the schema in order to generate the stub. Here is what I did to the WSDL as per the suggestion:
 <s:element minOccurs="0" maxOccurs="1" name="GetQuoteDataSetResult">  
        <s:complexType>  
         <s:sequence>  
          <!-- s:element ref="s:schema" /-->  
          <s:any minOccurs="2" />  
         </s:sequence>  
        </s:complexType>  
 </s:element>  

After the change the maven plugin ran successfully to generate the Java code.

Ref: http://cxf.547215.n5.nabble.com/Thrown-by-JAXB-undefined-element-declaration-s-schema-td554126.html
Read More »

Free Sample WSDL URL For WebService Testing

Here are some sample WSDL URL for web-services testing. This will be great help to people who want to try out SOAP web-services. The most popular tool for SOAP/Rest service testing is SoapUI, which is available for free. Download and try out some of the below URL's.

1. Global Weather: This global Weather is quite popular, and it will generate two request - GetCitiesByCountry and GetWeather. First try get the predefined cities by country and then do a get weather.
http://www.webservicex.net/globalweather.asmx?WSDL


2. Currency converter: Another simple service to start with. The inputs are string format like USD, GBP, INR, etc. Open the wsdl in a browser to see all the currencies allowed.
http://www.webservicex.com/CurrencyConvertor.asmx?wsdl


3. Get Stock Quotes: This has three API as below -
GetQuote: The result is current stock quote, with other information like DayHigh, DayLow, StockVolume, OpenAmount, etc.
GetQuickQuote: The result is just the stock price.
GetQuoteDataSet: Response is stock information in a dataset.
http://ws.cdyne.com/delayedstockquote/delayedstockquote.asmx?wsdl


4. City Weather by zip code, for US only. API's are GetCityForecastByZIP - get City Forecast Over the Next 7 Days, GetCityWeatherByZIP - get current City’s Weather.
http://wsf.cdyne.com/weatherws/weather.asmx?wsdl


5. Country Information Service: Not only information related to a country but lot of API's to work with including ListOfContinentsByName, ListOfCountryNamesByName, ListOfCurrenciesByCode, ListOfCountryNamesGroupedByContinent, etc. you can do a lot of test scenarios with this WSDL.
http://webservices.oorsprong.org/websamples.countryinfo/CountryInfoService.wso?WSDL

6. Number conversion: Simple API's with only 2 request - NumberToDollars and NumberToWords.
http://www.dataaccess.com/webservicesserver/numberconversion.wso?WSDL
Read More »

How To Manage Stress Positively

Please watch this amazing TED talk from psychologist Kelly McGonigal "How to make stress your friend".
The best way to manage stress is by embracing it, this is a really new idea which I am sure will help us all in this stressful world of today.

We are all aware of the power of thinking positively, but this astonishing talk takes us to the next level by making us believe that stress is indeed good for our health.
Her presentation style and most importantly the concept is mind boggling and I am already a fan or her.
Its less than 15 mins, just watch it without getting disturbed and de-stress yourself for life.

Read More »

Hi-Fi(WiFi) days ahead!!!

  WiFi has become very popular now a days, most of us use it at home, office, hotels and also at most public places like airports, stations where we can connect to public hotspots. It is built into most devices like mobile devices, laptops, tablets, etc. It wouldn't be too much to say that, if you haven't used a WiFi connection yet, then you are in minority.

A non-profit organization Wi-Fi Alliance, formed by a worldwide network of companies defines standards for interoperability of Wi-Fi device and promote the technology. WiFi or Wireless networking is based on the IEEE 802.11 standards. Starting with our smart phones, laptops, more and more devices are now coming up with WiFi capabilities, and with the arrival of IoT(Internet Of Things) we can expect more varieties of WiFi devices in near future. Experts estimate approximately 20 billion WiFi devices by 2017. One of the biggest advantage of WiFi is it is wireless just like our cell phone connection but WiFi comes with a better data speed and easy to set-up or connect.

  Connecting to a WiFi network would usually require a SSID password to be provided whenever a new SSID is encountered. This was causing a major hindrance to the wide acceptance of WiFi, unlike the cell phone service where a password is not required when roaming.
Now with the release of Hotspot 2.0(HS2) based on the IEEE 802.11u standard, a device can automatically connect to a WiFi network. The device is authenticated to the WiFi Access Point(AP) using credentials such as username/password, X.509 certificate with no intervention from the human user. This is very much like we connect to a mobile carrier’s 3G of 4G network while roaming and use services as if we are in our home network.
If a device is subscribed to a WiFi Hotspot 2.0 service with roaming agreement in place, then it will allow users to securely roam on a WiFi network, and with so many OTT(over-the-top) players like Skype or other VoIP services we might not even need a cellular connection to make a long distance call or chat.
Image Source: FreeDigitalPhotos.net

 Most cable MSOs(Multiple-System operators), Fixed-Line broadband service operators and others are trying to cash in on this huge revenue generating opportunity and might be cutting into mobile network operators(MNOs) customer base already. With the help of Wi-Fi Alliance's Hotspot 2.0 and other technology programs these operators are coming up with carrier WiFi services trying to make WiFi ubiquitous. Estimated approximately 50 million WiFi hotspots already deployed across the world, and we are going to see more deployments sooner than later.
Image Source: FreeDigitalPhotos.net

WiFi gives a good opportunity for these players as it is an unlicensed spectrum, almost all mobile devices have WiFi capability and also more than 90% of tablets are shipped with WiFi only connection. Most devices going ahead will also support WiFi calling, for e.g. Apple iPhone 6 already supports Wi-Fi calling as well as voice over LTE (VoLTE).
Image Source: FreeDigitalPhotos.net

Taking advantage of their existing network, cable MSO's have started to deploy public WiFi network with HS2 technology. Google is already working on building a large-scale WiFi network with devices from Ruckus Wireless.

Cable MSOs and fixed-line operators are going to allow service or network sharing with MNOs or themselves for their customers which would allow an user to connect where Wi-Fi Access Points(AP) isn't available. Several big MSO already announced sharing Wi-Fi network under a new alliance called "CableWiFi", which would allow users access to Wi-Fi outside their home network. With the same Wi-Fi network available at home and outside, this is going to give users a really good alternative to cellular service and with an excellent customer experience.
Image Source: FreeDigitalPhotos.net
Read More »

Internet Of Things(IoT) and the Broadband Forum TR-069

Of-late I haven't written much, as I switched jobs few months back, and have been too busy learning, exploring new waters. Don't know, but starting to feel the same in the new environment, already ;)
In this post, lets try put something related to the Broadband Forum TR-069 CPE WAN Management Protocol, as I have been working in this domain long enough and never got a chance to write something on this topic. Basically lets see what Broadband Forum(BBF) is doing about "Internet Of Things" or IoT which is the future of Internet as experts say.

Very brief intro of TR-069:
Technical Report 069(TR-069) is a specification from Broadband Forum(BBF) also called CPE WAN Management Protocol (CWMP), has been around for more than a decade. The protocol defines standard for communications between customer-premises equipment (CPE) devices, such as modems, gateways, set-top boxes, VoIP phones; and the Auto Configuration Servers (ACS). The protocol is mainly used for for automatic configuration and management of these CPE by an ACS. And it has been very successful in doing that, as we are already seeing nearly 300 million devices managed worldwide and it is still growing. The protocol which was earlier mostly used for DSL modems is now adopted by cable operators to manage cable modems.


As we all know, the current buzz in the market is about Internet Of Things(IoT) and how it will change our environment and lives. Experts estimates that there would be an upwards of 20 million devices connected by year 2020. The Consumer Electronics Show(CES) 2015 was mostly about the IoT smart devices which can communicate/talk with other devices like smartphones. Well there are already devices in market worldwide for e.g. smart TV, which can already communicate with smartphones. In the very near future, we are going to see more other devices like smart watches, smart-thermostats, smoke detectors, HealthKits and smart home devices.

With the ever evolving technologies, and now the advent of the IoT devices in our home environment there has been a continuous need for developing the TR-069 protocol. BBF has always been ahead on this and apart from releasing other technical reports like TR-181, etc, time to time, we have the latest TR-069 at Amendment-5.  Now it should be able to leverage its success and encompass the IoT device management, in order to catch up with the modern trend. As per the latest(17/June/2015) newsletter from BBF, they have been adding new features/improvement in TR-069 to support deployment and management of IoT devices. Well it will be really interesting to see the outcome, as this might be a win-win situation for the consumers and the telecommunication operators. Consumers with TR-069 CPE's will have their smart IoT devices managed by the same telecommunication providers. And telecom providers would be happy to oblige :)
Also, as per the 12th June 2015 press release, TR-069 is going to play an important role in IoT market and most service providers look forward to it.

Other than that, BBF also is working towards a new service platform  for activating, managing, monitoring, diagnosing, and controlling network enabled services. The protocol and models, including the implementation guidelines and other materials expected to be delivered by Q2 2016. That's next year, cheers!!!

About the Broadband Forum
Broadband Forum, a non-profit industry organization, is focused on engineering smarter and faster broadband networks. Our work defines best practices for global networks, enables service and content delivery, establishes technology migration strategies, engineers critical device & service management tools, and is key to redefining broadband. Our free technical reports and white papers can be found at www.broadband-forum.org. Twitter @Broadband_Forum.

Source: The Broadband Forum
https://www.broadband-forum.org/
http://www.broadband-forum.org/marketing/newsletter/June15.pdf
https://www.broadband-forum.org/news/download/pressreleeases/2015/BBF_Q2_2015_FINAL_12June2015.pdf
https://www.broadband-forum.org/news/download/pressreleeases/2014/BBF_Q2meeting_TR-069_FINAL_25June2014.pdf
Read More »

BDD Cucumber - Might Not be for a regular QA!

BDD Cucumber used with Selenium seems to be quite popular now a days for Automation framework. We have been using a BDD framework with Selenium for our Automation including Integration Tests. The tests are being added by the test team and dev team and they are run as part of build process(CI).
Though it is good that everybody, starting from the customer to the higher executives can read the tests, as the steps are written in (simple?) human understandable language - Gherkin, but BDD has its own limitations. Here are a few of the drawbacks that we encountered during our journey:

1. Steep Learning curve: A QA member is not a programming expert, else he should be in development. In our test team we had a mix of Java programmer(basic) and non-programmers. We really had a tough time explaining about Cucumber BDD to the non-programmers, and they still are not able to write tests properly. Imagine a non-programmer, who never has written a piece of code has to learn Java, Selenium, Cucumber and the BDD style of writing tests. Instead he could have simply learnt Java, Selenium and start adding tests with TestNG. In TestNG or Junit you don't need to worry about Given/When/Then. As for the programmer they still make mistakes writing proper Given/When/Then.

2. Translating test cases to BDD "scenario" is not fun: When we started automating, we already had more than 2000 odd testcases for our product, and those are not written thinking of BDD. We had to update/edit the test steps, split  testcases, carve out new steps to be inline with BDD. This is a huge overhead, we had to spend a considerable amount of time on this. Also when we write a new testcase we might actually think in plain English and not in BDD style. Writing testcases with BDD mindset is something which will come with good experience.
Again convention says, when we create a new step in Cucumber, we should make it generic in order to to be re-usable. With this in mind, we try to group similar tests in one "Feature" file. Again an overhead, scanning though different testcases to pick the similar ones. We have to do this because the less the files the better, and then people don't expect to write one "Feature" file for each testcase.

3. Limited Annotations as compared to other frameworks(TestNg, Junit): Cucumber has "Hooks" like @Before, @After. These are called for each "Scenario" from the "Feature" file. Annotations like @BeforeClass, @AfterClass, @BeforeSuite, etc from TestNg are not available in Cucumber. We know this could be achieved in Cucumber with "Runtime.getRuntime().addShutdownHook...", but wouldn't it be better if something is available out of the box? Also what about parallel test execution, of-course we can do this with Selenium, but TestNG and Junit already has this option compared to Cucumber.

4. The Gherkin is not-so-simple to be understood by stakeholder/customers: The Given-When-Then are usually written by technical person either test or dev member. Now our customer is a non-technical, business person who might not think the way as a technical guy. This itself defeats the main purpose of Cucumber that the stakeholder can read and understand Cucumber language. Also how many people other than a QA guy, cares about test steps. Unless there is some critical customer issue, nobody wants to go through the test steps in detail, even a developer have to be reminded multiple times to review a testcase.
Now for argument sake, lets say our customer is a technical person. How likely is it that he knows BDD Steps? Is he going to learn cucumber-BDD for reviewing your tests? Not yet, until he is forced upon :).

5. DuplicateStepDefinitionException seems to occur often: We have been seeing this often times. This occurs when we have duplicate methods in different class files and its likely to occur as different testcases have similar steps. Best solution to avoid this is to checkout all tests and run it locally before committing yours. The problem is people doesn't follow the solution, out of laziness or are in a hurry to automate more :).

Finally, saying all this drawbacks does-not mean that we are stopping with Cucumber. We are loving every bit of it and with each and every issue we are happy we learnt something new today. After all we are engineers and we keep learning!!!
Read More »

About Oracle NULL value

In a Database table if a column has no value, then the column is said to be NULL. It could be said as a place-holder where the database does not have any information about the value. It represents nothing, not a space, not a zero(0), nor a blank value.

1) A null value is not equal nor unequal to another null, i.e. can't use operators like "=" or "!=". Though, Oracle considers two nulls to be equal when evaluating a DECODE function. NULL values can be only tested with IS NULL and IS NOT NULL conditional operator.
hr@ORA10G> SELECT * FROM test_table ORDER BY id;
        ID COL1       COL2             COL3
---------- ---------- ---------- ----------
         1 KA         blr               100
         2            del
         3
         4 MAH                          400

hr@ORA10G> SELECT * FROM test_table WHERE col3 = NULL;
no rows selected

hr@ORA10G> SELECT * FROM test_table WHERE col3 IS NULL;
        ID COL1       COL2             COL3
---------- ---------- ---------- ----------
         2            del
         3

hr@ORA10G> SELECT * FROM test_table WHERE col3 IS NOT NULL;
        ID COL1       COL2             COL3
---------- ---------- ---------- ----------
         1 KA         blr               100
         4 MAH                          400

2) An expression containing a null value always returns a null value. For e.g. arithmetic expression containing a null value always results to null.
For e.g. 25+null will give result as null.
hr@ORA10G> select * from test_table order by id;
        ID COL1       COL2             COL3
---------- ---------- ---------- ----------
         1 KA         blr               100
         2            del
         3
         4 MAH                          400

hr@ORA10G> select col3+300 from test_table where id=2;
  COL3+300
----------


hr@ORA10G> select col3+300 from test_table where id=1;
  COL3+300
----------
       400

3) Most aggregate function like AVG(), COUNT(), ignore null values.
hr@ORA10G> select * from test_table order by id;
        ID COL1       COL2             COL3
---------- ---------- ---------- ----------
         1 KA         blr               100
         2            del
         3
         4 MAH                          400

hr@ORA10G> select avg(col3) from test_table;
 AVG(COL3)
----------
       250

hr@ORA10G> select count(col3) from test_table;
COUNT(COL3)
-----------
          2


4) The NULL values in the column sort as the highest value by default.
hr@ORA10G> select * from test_table order by col3 desc;
        ID COL1       COL2             COL3
---------- ---------- ---------- ----------
         2            del
         3
         4 MAH                          400
         1 KA         blr               100

5) The functions REPLACE, CONCAT, DECODE, NVL, NVL2 returns non-null values when invoked with a null argument. Most others scalar functions returns null with a null argument.
Both NVL() and NVL2() function replace null values with a specified value.

NVL(exp1, exp2) - This returns exp2 if exp1 is null, else return exp1. Both exp1 and exp2 should be of same datatype or it must be possible to implicitly convert exp2 to the type of the exp1.
hr@ORA10G> SELECT NVL('abc','xyz') FROM dual;
NVL
---
abc

hr@ORA10G> SELECT NVL(null,'xyz') FROM dual;
NVL
---
xyz

hr@ORA10G> SELECT NVL(123,'xyz') FROM dual;
SELECT NVL(123,'xyz') FROM dual
               *
ERROR at line 1:
ORA-01722: invalid number
The last example above is an error because 'xyz' cannot be converted to a number.

NVL2(exp1, exp2, exp3) - If exp1 is null then returns exp3, else return exp2. The datatypes of exp2 and exp3 must be compatible, or it must be possible to convert exp3 to the type of the exp2.
hr@ORA10G> SELECT NVL2('aaaa','bbbb','cccc') FROM dual;
NVL2
----
bbbb

hr@ORA10G> SELECT NVL2(null,'bbbb','cccc') FROM dual;
NVL2
----
cccc

hr@ORA10G> SELECT NVL2(null,'bbbb',1234) FROM dual;
NVL2
----
1234

hr@ORA10G> SELECT NVL2(null,1234,'cccc') FROM dual;
SELECT NVL2(null,1234,'cccc') FROM dual
                      *
ERROR at line 1:
ORA-01722: invalid number
The last example above is an error because 'cccc' cannot be converted to a number, whereas in the previous example it is possible to convert value "1234" to a varchar2 type.

Ref: http://docs.oracle.com/cd/B19306_01/server.102/b14200/sql_elements005.htm
Read More »