Part 3 Creating a Database Instance
In part2 we have installed the software files, now we will create a database instance using the Oracle Database Configuration Assistant(DBCA) tool. Apart from creating DB, the tool also provide options to configure, delete a database.
The dbca tool is located at $ORACLE_HOME/bin. As the oracle user go to the directory and type dbca to open the dbca GUI. Follow the screenshots below:
1. Welcome: Click Next

2. Operations: Select "Create a Database" and click Next.

3. Database Templates: We can select from the predefined database templates - "General Purpose or Transaction Processing" and "Data Warehouse", or we can opt to create a "Custom Database". We can see the template details by clicking the "Show Details" button.
Select "General Purpose or Transaction Processing" and click Next.

4. Database Identification: Provide a "Global Database Name", should be unique within the network domain. Also provide a "Oracle System Identifier" or Oracle SID of max 8 characters. Click Next.

5. Management Options: If we select "Configure Enterprise Manager", it will require us to create a listener before going on to next step. So untick "Configure Enterprise Manager" if you have not done the listener already and click Next.

6. Database Credentials: Select "Use the Same Administrative Password for All Account", this is easy to remember :). Provide a password and click Next.
If you have provided a really easy password as I did, you will be presented with a confirmation pop-up, click Yes on the pop-up to continue.

7. Database File Locations: I prefer to keep the defaults. Storage Type as "File System" and Storage Locations as "Use Database File Locations from Template". You can select other options "Use Common Location ..." for which you may need to create a separate directory in the box, or you can select "Use Oracle-Managed Files" for Automated Storage Management (ASM). Click Next.

8. Recovery Configuration: Flash Recovery area is used to the store and manage files required for recovering a database. Tick "Specify Fast Recovery Area" and "Enable Archiving" and click Next.

9. Database Content: Tick/UnTick"Sample Schemas" as per needs, and click Next. Optionally if you want to run some custom scripts you can do that under Custom Scripts tab.

10. Initialization Parameters(Memory): We will let Oracle allocate memory to the components within System Global Area (SGA) and Process Global Area (PGA). Select Typical and change Memory Size as per needs, here its changed to 10GB. Click Show Memory Distribution and see how Oracle allocates the memory. Optionally we can tick the "Use Automatic Memory Management" to let Oracle manage the memory distributions. We can also select Custom Memory Management to configure the memory. Select Sizing tab.

11. Initialization Parameters(Sizing): Block Size setting defines the smallest unit of storage in the database. You can update initialization parameters once the DB is installed. Change the Processes as per needs. Select Character Sets tab.

12. Initialization Parameters(Character Sets): Select the char sets as per needs. Here AL32UTF8 is selected so that I can do store multiple language characters. We can select the default if we are going to use mostly English language. Select Connection Mode tab.

13. Initialization Parameters(Connection Mode): Tick "Dedicated Server Mode" and click Next.

14. Database Storage(Controlfile - General): In Database Storage we can review and update the locations of the DB objects like, datafiles, control files, and redo logs. I prefer keep the defaults for now, we can ofcourse update later when required. Select "Controlfile" on left pane, review it and click Options tab.

15. Database Storage(Controlfile - Options): In Options tab, change the values as required and click Datafiles on the left pane.

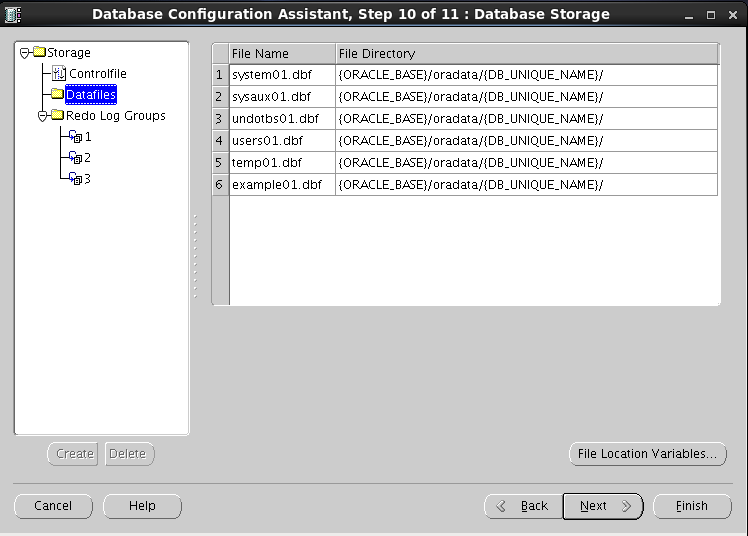
16. Database Storage(Datafiles): Keep defaults and click "1" in left pane under Redo Log Groups.
17. Database Storage(Redo Log Groups 1): Review and update if required, click "2".

18. Database Storage(Redo Log Groups 2): Review and update if required, click "3".

19. Database Storage(Redo Log Groups 3): Review and update if required, click Next.

20. Creation Options: Here we can create a DB immediately or save a template or generate DB creation scripts. "Create Database" will immediately create one. "Save as Database Template" will save our definitions to a template which can be used to create DB later. "Generate DB creation scripts" will create the necessary scripts that we can run to create a database. Tick "Create Database" and click Finish.

21. Confirmation: Scroll and review the summary of our selections. You can save as HTML for future references. Once done click OK to install the database.

22. Installation... great!!
Sit patiently and watch the interesting installation ;) or you can go for a cup of coffee.

23. DB Creation complete, cheers!!
Once the DB creation is done we can see the information about our newly created DB.

This concludes our database creation steps, we now have our own DB to start playing around with :).
You can update the Oracle user's .bash_profile to include the ORACLE_SID.
#vi /opt/oracle/.bash_profile and add the below lines:
Whats Next:
We will configure Oracle Net on this server so that clients can connect to our database.
In part2 we have installed the software files, now we will create a database instance using the Oracle Database Configuration Assistant(DBCA) tool. Apart from creating DB, the tool also provide options to configure, delete a database.
The dbca tool is located at $ORACLE_HOME/bin. As the oracle user go to the directory and type dbca to open the dbca GUI. Follow the screenshots below:
1. Welcome: Click Next
2. Operations: Select "Create a Database" and click Next.
3. Database Templates: We can select from the predefined database templates - "General Purpose or Transaction Processing" and "Data Warehouse", or we can opt to create a "Custom Database". We can see the template details by clicking the "Show Details" button.
Select "General Purpose or Transaction Processing" and click Next.
4. Database Identification: Provide a "Global Database Name", should be unique within the network domain. Also provide a "Oracle System Identifier" or Oracle SID of max 8 characters. Click Next.
5. Management Options: If we select "Configure Enterprise Manager", it will require us to create a listener before going on to next step. So untick "Configure Enterprise Manager" if you have not done the listener already and click Next.
6. Database Credentials: Select "Use the Same Administrative Password for All Account", this is easy to remember :). Provide a password and click Next.
If you have provided a really easy password as I did, you will be presented with a confirmation pop-up, click Yes on the pop-up to continue.
7. Database File Locations: I prefer to keep the defaults. Storage Type as "File System" and Storage Locations as "Use Database File Locations from Template". You can select other options "Use Common Location ..." for which you may need to create a separate directory in the box, or you can select "Use Oracle-Managed Files" for Automated Storage Management (ASM). Click Next.
8. Recovery Configuration: Flash Recovery area is used to the store and manage files required for recovering a database. Tick "Specify Fast Recovery Area" and "Enable Archiving" and click Next.
9. Database Content: Tick/UnTick"Sample Schemas" as per needs, and click Next. Optionally if you want to run some custom scripts you can do that under Custom Scripts tab.
10. Initialization Parameters(Memory): We will let Oracle allocate memory to the components within System Global Area (SGA) and Process Global Area (PGA). Select Typical and change Memory Size as per needs, here its changed to 10GB. Click Show Memory Distribution and see how Oracle allocates the memory. Optionally we can tick the "Use Automatic Memory Management" to let Oracle manage the memory distributions. We can also select Custom Memory Management to configure the memory. Select Sizing tab.
11. Initialization Parameters(Sizing): Block Size setting defines the smallest unit of storage in the database. You can update initialization parameters once the DB is installed. Change the Processes as per needs. Select Character Sets tab.
12. Initialization Parameters(Character Sets): Select the char sets as per needs. Here AL32UTF8 is selected so that I can do store multiple language characters. We can select the default if we are going to use mostly English language. Select Connection Mode tab.
13. Initialization Parameters(Connection Mode): Tick "Dedicated Server Mode" and click Next.
14. Database Storage(Controlfile - General): In Database Storage we can review and update the locations of the DB objects like, datafiles, control files, and redo logs. I prefer keep the defaults for now, we can ofcourse update later when required. Select "Controlfile" on left pane, review it and click Options tab.
15. Database Storage(Controlfile - Options): In Options tab, change the values as required and click Datafiles on the left pane.
16. Database Storage(Datafiles): Keep defaults and click "1" in left pane under Redo Log Groups.
17. Database Storage(Redo Log Groups 1): Review and update if required, click "2".
18. Database Storage(Redo Log Groups 2): Review and update if required, click "3".
19. Database Storage(Redo Log Groups 3): Review and update if required, click Next.
20. Creation Options: Here we can create a DB immediately or save a template or generate DB creation scripts. "Create Database" will immediately create one. "Save as Database Template" will save our definitions to a template which can be used to create DB later. "Generate DB creation scripts" will create the necessary scripts that we can run to create a database. Tick "Create Database" and click Finish.
21. Confirmation: Scroll and review the summary of our selections. You can save as HTML for future references. Once done click OK to install the database.
22. Installation... great!!
Sit patiently and watch the interesting installation ;) or you can go for a cup of coffee.
23. DB Creation complete, cheers!!
Once the DB creation is done we can see the information about our newly created DB.
This concludes our database creation steps, we now have our own DB to start playing around with :).
You can update the Oracle user's .bash_profile to include the ORACLE_SID.
#vi /opt/oracle/.bash_profile and add the below lines:
ORACLE_SID=jade11g
export ORACLE_SID
Whats Next:
We will configure Oracle Net on this server so that clients can connect to our database.
No comments:
Post a Comment